
You're usually reading about a bathroom sink drain pipe when something has already gone wrong. The sink is draining slow. It burps air after the water goes down. There's a musty smell under the vanity. Or you opened the cabinet and found a drip hanging off a slip nut.
That small assembly under the sink looks simple, but it does three jobs at once. It moves wastewater out, holds back sewer gas, and gives you just enough access to clean and service the line without opening a wall. When one part is wrong, the whole thing starts talking to you through symptoms. Gurgling, odors, leaks, and repeated clogs are all signals.
Many homeowners jump straight to drain cleaner or a cheap hand snake. Sometimes that works. Sometimes it turns a basic cleanup into a broken fitting, a cracked trap, or a bigger service call. The difference usually comes down to knowing what each part does and what failure pattern you're looking at.
zing and Installation Best Practices](#drain-pipe-sizing-and-installation-best-practices)
- What a clean installation looks like
- Slow drain and full blockage
- What to verify before anyone starts work
- Why proof of past work matters
Your Guide to the Unsung Hero Under the Sink
The drain under a bathroom sink doesn't get much respect because it only gets noticed when it stops doing its job. A faucet gets the attention. The vanity gets the money. The drain assembly gets ignored until water starts standing in the bowl and the sink makes that hollow gurgling sound on the way down.
In the trade, this is one of those systems that rewards basic understanding. If you know the names of the parts and the job each part handles, you can sort a simple hair clog from a venting problem, and a loose slip joint from a failing pipe in the wall. That saves time and often saves a lot of unnecessary mess.
Practical rule: Treat the symptom as a clue, not the diagnosis. Slow drainage, odor, and leaking each point to a different part of the assembly.
A bathroom sink drain pipe is also part of a bigger hygiene system, not just a convenience line. The modern version of this setup grew out of the plumbing changes that made indoor bathrooms safe in the first place. That history matters because the same design rules still decide whether a sink stays odor-free or turns into a recurring problem.
A good sink drain should be boring. Water goes down fast, the cabinet stays dry, and you never smell the sewer. When it doesn't, the fix usually starts with anatomy, then materials, then installation quality, then honest troubleshooting.
The Anatomy of a Bathroom Sink Drain Assembly
Under the sink, every fitting has a job. If you learn the path water takes from the basin to the wall, you can diagnose most common failures without guessing.

What each part does
Start at the top.
Think of the assembly like a one-way hallway with a guard at the door. Wastewater gets to leave. Sewer gas doesn't get to come back. The guard is the water sitting in the P-trap.
A trap isn't there to catch debris first. Its main job is to hold a water seal between your home and the drainage system.
Most drain complaints happen because one of these parts is either dirty, loose, misaligned, or connected to a larger system that isn't venting or draining correctly.
Why the trap and vent matter so much
The most important concept for an apprentice or a homeowner to understand is that the sink drain works because of both gravity and air. Water needs a path down, but it also needs balanced air pressure so the trap doesn't get siphoned dry.
That principle was a major public health breakthrough. The Venting Theory, proven in 1874, showed that connecting a vent pipe to the drain at the trap outlet equalized air pressure and prevented siphoning that would let sewer gases escape. That P-trap and venting setup became the global standard for safe indoor bathrooms, as described in this plumbing history overview.
If you've ever smelled a strong sewer odor at a sink even when nothing looks broken, think about that trap seal first. Either the trap lost its water, the venting is wrong, or a connection is leaking gas before water ever shows up.
Here's the practical version of the anatomy lesson:
Once that sequence makes sense, troubleshooting stops feeling random.
Choosing the Right Drain Pipe Materials and Traps
Not every under-sink assembly is built from the same material, and not every trap design deserves to stay in service. Material choice affects durability and ease of repair. Trap choice affects whether the drain is safe and code-friendly.
Common materials under a bathroom sink
In homes today, you'll usually see PVC, ABS, or chrome-plated brass under a bathroom sink. Each has a place.
| Material | Cost | Durability | DIY Friendliness |
|---|---|---|---|
| PVC | Lower-cost option | Good for normal residential use | Easy to cut and assemble |
| ABS | Similar budget-friendly option in areas where it's accepted | Good impact resistance | Easy to work with |
| Chrome-plated brass | Usually costs more than plastic options | Durable, but finish can age in damp cabinets | Moderate, because alignment matters and over-tightening can damage parts |
PVC is the workhorse for many repair jobs. It's light, easy to trim, and forgiving when you're replacing a trap or tailpiece. ABS is also common in some regions. It handles under-sink service well, but local acceptance varies, so you match the material to local code and the existing system.
Chrome-plated brass shows up more often on exposed sinks or older installations where appearance matters. It looks better in open vanities, but it gives you less room for sloppy assembly. Cross-thread one nut or force one crooked washer and you'll chase drips.
Shop advice: The best material is the one that fits the existing system cleanly, seals without strain, and is accepted where the work is being done.
There's also value in remembering how much better modern materials are than what came before. Cast-iron pipes changed American drainage starting in 1819, replacing fragile wooden log pipes. By 1829, Boston's Tremont Hotel used cast-iron drain pipes under sinks as part of the first indoor plumbing setup of its kind, helping reduce failures and curb waterborne disease, according to this history of plumbing materials.
That old progression tells you something useful. Plumbing got better when materials became more stable, more durable, and more predictable. Under a sink, predictable matters.
P-trap versus S-trap
A proper P-trap exits horizontally into the wall. An S-trap drops vertically and can pull its own water seal out during discharge. That's the core problem.
If the trap siphons itself dry, the sink may still drain, but the gas barrier is gone. Now the homeowner thinks they have a “smell problem” when they really have a trap design problem.
A quick comparison makes it plain:
If you open a vanity and find an S-trap, don't spend time trying to make bad geometry behave. Replace it with a proper P-trap layout.
Drain Pipe Sizing and Installation Best Practices
A bathroom sink can look fine and still be piped wrong. The two installation details that matter most are size and clean alignment. Get those wrong and the drain may work just well enough to fool you for a while.

Size first, then alignment
Professional plumbing codes require a minimum 1¼-inch trap arm for bathroom sinks, based on Drainage Fixture Unit calculations. Undersizing is a common cause of slow drainage, backups, and code trouble, as noted in this discussion of sink drain sizing and DFU loading.
That minimum matters because the drain line has to move water and air together without choking itself down. Homeowners sometimes assume smaller means tighter and better. It usually means fussier and slower.
A few field rules help:
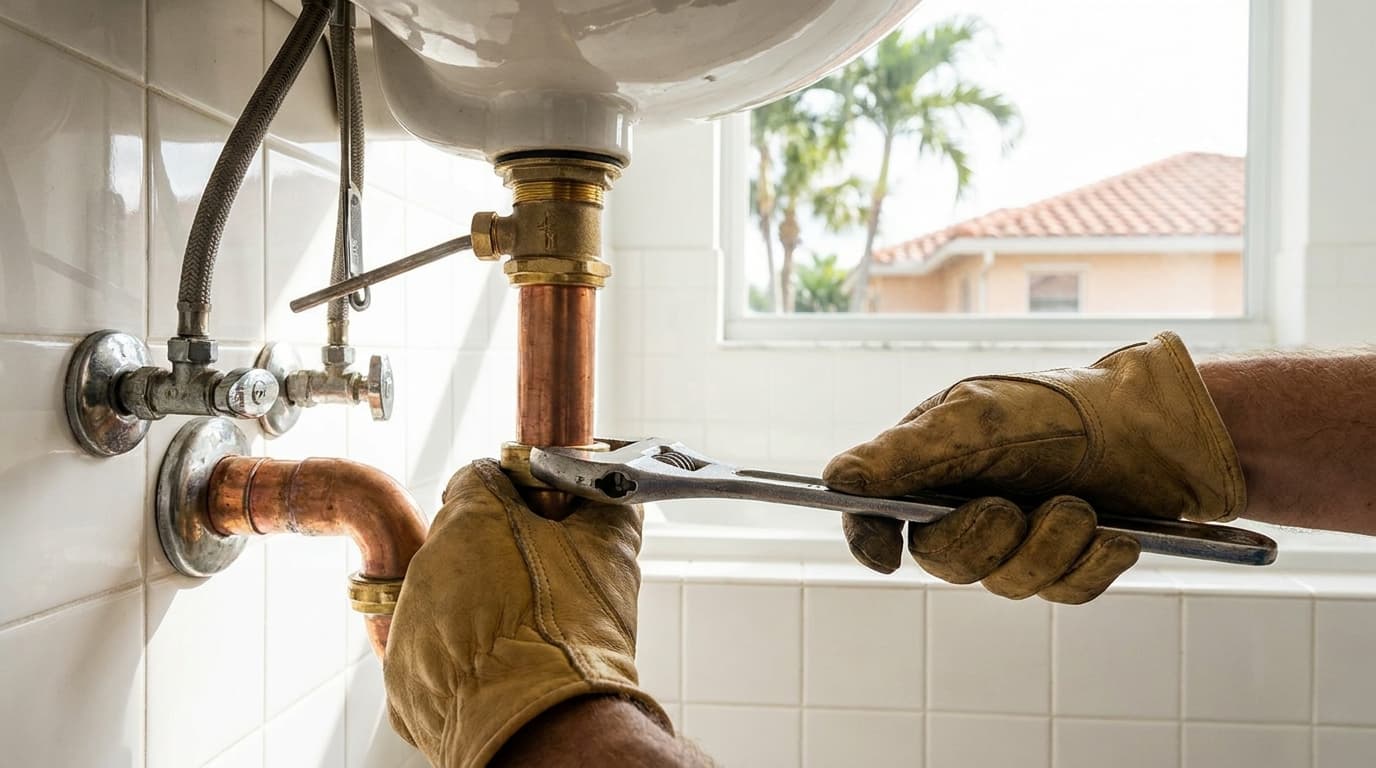
What a clean installation looks like
A good under-sink installation looks almost plain. The tailpiece drops straight. The trap lines up without torque. The nuts are snug, not crushed. The trap arm enters the wall square.
Here's what usually causes callbacks:
If the assembly looks like it had to be talked into fitting, it probably won't stay dry for long.
The neatest install is often the most reliable one. Under a bathroom sink, simple is professional.
How to Troubleshoot Common Sink Drain Failures
Most sink drain problems fall into three buckets. Water leaves too slowly, water leaks before it reaches the wall, or sewer odor makes it back into the room. Each symptom points you toward a different part of the system.

Slow drain and full blockage
A bathroom sink usually clogs high in the assembly before it clogs deep in the branch line. Hair wraps around the stopper. Toothpaste and soap collect in the tailpiece. Sludge builds inside the trap.
Start with the simple checks:
One growing cause of slow bathroom sink drain pipe performance is mineral scale, not just hair. Hard water affects 85% of U.S. households, and mineral deposits can narrow drain lines significantly. Weekly enzyme cleaner use can prevent up to 80% of that buildup and outperforms traditional vinegar solutions, based on this explanation of mineral-related slow drains.
That matters because hard-water restriction doesn't always announce itself with a dramatic clog. It often shows up as a sink that gets slower month by month.
For a quick homeowner screening process, this contractor hiring checklist for home repair decisions helps when you're deciding whether the issue still looks like maintenance or is starting to look like diagnosis.
A short visual walkthrough can help if you're dealing with a typical under-sink clog or leak:
Leaks and bad smells
Leaks under a sink usually come from one of four places: the drain flange seal, the slip nuts, a cracked trap, or corrosion on older metal parts. Dry the whole assembly first. Then run water and watch with a flashlight. Don't diagnose drips on wet parts.
Try this order:
Bad smell is different. If there's no active leak, think trap seal, buildup, or a venting issue. Organic sludge inside the overflow channel or tailpiece can smell nasty without any sewer gas being involved.
Clean first, then judge the odor. A true sewer smell and a dirty drain smell are not the same thing.
If you clean the stopper, trap, and tailpiece and the odor stays sharp and sewer-like, the problem may be beyond the visible assembly.
When to DIY vs When to Hire a Professional
Some bathroom sink drain pipe work is good DIY territory. Some of it is where confident homeowners make expensive mistakes. The key is knowing when you're performing maintenance and when you're trying to diagnose a hidden system problem.
Good DIY territory
Cleaning a sink drain assembly is usually fair game if you work carefully.
Safe, reasonable DIY jobs include:
These jobs stay in the open. You can see the parts, test them immediately, and undo your work if something isn't right.
Red flags that mean stop
Repeated slow drainage with noise is where I tell people to get cautious. Persistent slow drainage with gurgling after trap cleaning can indicate a corroded or collapsed pipe, a problem affecting 20% to 30% of homes built before the 1980s. Aggressive DIY snaking can worsen that damage and turn a potential $300 repair into a $1,000+ emergency, according to this overview of hidden drain pipe failure signs.
That's why these symptoms deserve a pro:
If you're at that point, skip the gamble and check a verified plumber directory instead of hiring the first name that answers the phone.
A good plumber doesn't just clear the symptom. They figure out whether the actual failure is in the trap, the branch line, the vent, or the old pipe buried behind the finish surface.
How to Hire a Plumber You Can Actually Trust
Bad drain work can stay hidden for a while. A loose vanity trap shows up fast. A poorly installed wall connection, bad venting choice, or sloppy retrofit may not show up until the cabinet swells, the room smells, or the sink starts clogging again.

What to verify before anyone starts work
Before you hire, confirm the basics:
If you want a smart background read on how contractors present themselves online, this guide to optimizing plumbing businesses for AI search is useful because it shows what credible, well-documented local service visibility looks like from the contractor side.
For homeowners, license checking shouldn't be optional. A practical place to start is this guide to contractor license verification, especially if you're comparing more than one bid.
Why proof of past work matters
Reviews matter, but drain work is technical. You want to see proof that someone can install clean trap geometry, service older piping without damaging it, and document what they found. Good plumbers leave a trail of real work, not just star ratings.
The best hires usually share three traits. They explain the problem in plain language. They show what they found. They recommend the smallest fix that solves the issue.
If you need a plumber and want more than a guess, use HomeProBadge to find verified home service pros with visible credentials, proof-of-work, and real project history before you book.