


A pantry can cost anywhere from $250 for a reach-in shelf upgrade to $20,000 or more for a framed room conversion, and the right path depends on whether you're solving a storage problem or adding square footage. Before you buy cabinets or pick paint, decide which problem you're paying to fix.
You're probably standing in a kitchen where cereal boxes occupy the counter, appliances are stacked behind one another, and the cabinet you need most often has become a small excavation site. The word “pantry” makes the solution sound simple, but it can describe a shelf insert, a finished closet, a converted room, or a new addition. Those projects have very different construction requirements, budgets, timelines, and points where DIY stops making sense.
That distinction matters because household storage is a functional constraint, not only a style preference. One housing survey found that 61% of houses had adequate cupboards, while 5% had no storage cupboards, highlighting a meaningful gap between the storage many homes have and the storage households need (Nutrition Journal household food storage research). The global kitchen storage and pantry organization products market was estimated at USD 131.43 billion in 2023 and is projected to reach USD 182.08 billion by 2030, with jars and containers representing about 27% of global revenue in 2023 (Grand View Research market report). A working pantry therefore depends on access, capacity, and the way you use food, not just attractive cabinetry.
ze, Layout, and Shelf Depths](#plan-the-size-layout-and-shelf-depths)
- Sketch the room before choosing the finish
- Follow the construction order
- Prevent the two expensive tear-outs
- Identify the budget escalators
- Build a lighting layer, not a single bright spot
- Plan ventilation before the chase disappears
- Know when a pro is the economical choice
- Choose the honest level of help
Decide What Kind of Pantry You Are Actually Building
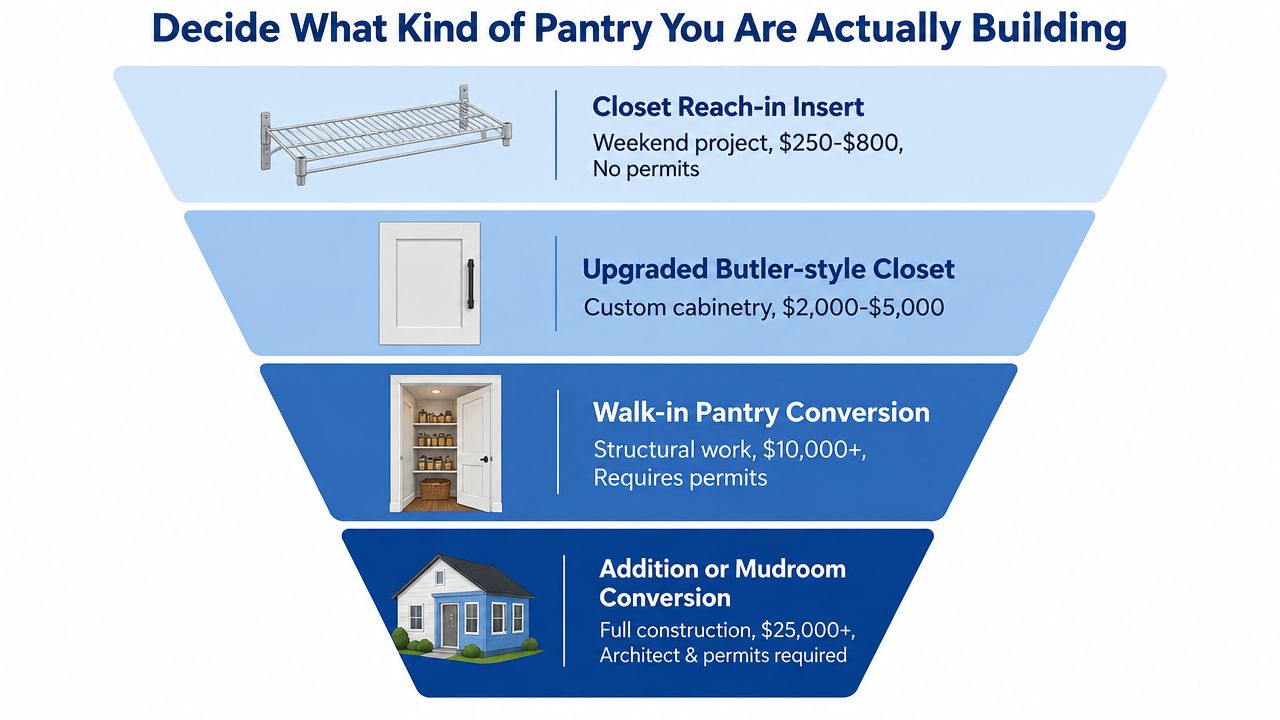
The first decision isn't whether you prefer painted wood or adjustable wire. It's whether your existing footprint can solve the problem. If you only need to replace overflowing cabinets, a reach-in insert may be enough. If you want appliance storage, a countertop, plumbing, or a new room, you're no longer shopping for shelving. You're defining a remodel.
A useful starting point is to sort the project into four practical tiers:
The exact label matters less than the work behind it. A pantry that stays inside existing walls is different from one that requires a doorway relocation or new electrical circuit. For ideas about circulation and storage zoning, review this guide to a smart walk in pantry layout, then compare the same planning logic with other built-in storage work in this wardrobe installation guide.
Use five questions before you draw anything
A simple decision tree keeps the scope honest. If your goal is more organized dry storage and you have an existing closet, start with shelving. If you need a counter and appliance station, consider a finished closet. If you need a room, inspect the available footprint and permit implications. If you need new square footage, speak with a qualified contractor before ordering anything.
Plan the Size, Layout, and Shelf Depths
Once the scope is clear, measure the room as a working envelope, not as an empty box. Record every wall length, ceiling height, doorway width, door swing arc, outlet location, baseboard projection, and obstruction. Then inventory the objects that will live there. A pantry designed around a wish list often fails because the actual appliances, bins, cans, and awkward packages weren't measured first.
Neutral pantry design guidance commonly places a walk-in pantry at about 5 feet by 5 feet, with a 36-inch aisle preferred and shelf depths of 10 to 16 inches (practical pantry layout guidance). Those dimensions aren't a decorative formula. They protect the one feature that makes a pantry useful, the ability to see and reach what you own.
Shelf depth should follow the contents:
| Shelf Depth | Best For | Reach Rule |
|---|---|---|
| 10 to 12 inches | Cans, spices, jars, and daily ingredients | Keep the front row visible and easy to lift |
| 12 to 14 inches | Boxed food and medium containers | Group similar heights so packages don't hide one another |
| 14 to 16 inches | Small appliances and larger storage bins | Reserve deeper shelves for less frequent access |
| 16 inches or more | Bulk storage only | Use pull-outs or full visibility, otherwise the back becomes dead space |
Shelves deeper than roughly 16 inches can bury inventory unless you add drawers, pull-out trays, or a deliberate bulk-storage zone. Put frequently used items between waist and eye level. Items above eye level should stay in clearly labeled bins, and anything below the knee works better in a pull-out basket than on a fixed shelf.
Sketch the room before choosing the finish
For a 5-by-7 walk-in, place shelves along the two long walls and use the short wall for shallow storage or a counter. Keep the central aisle at the preferred clearance, and avoid turning the doorway into a pinch point. Appliances should sit where their doors and cords won't conflict with the traffic path.
For a 3-by-2 reach-in, use one back wall with shallow shelves, or side-mounted shelves only if the opening and door hardware allow full access. A deep shelf across the entire width may look efficient on paper, but it creates a back row that requires unloading the front row.
Your planning worksheet should include:
For broader room-planning principles, these kitchen design tips from RBA Home Plans are useful because they treat circulation and work zones as connected decisions rather than isolated cabinet measurements.
The Build Sequence From Framing to Finishes
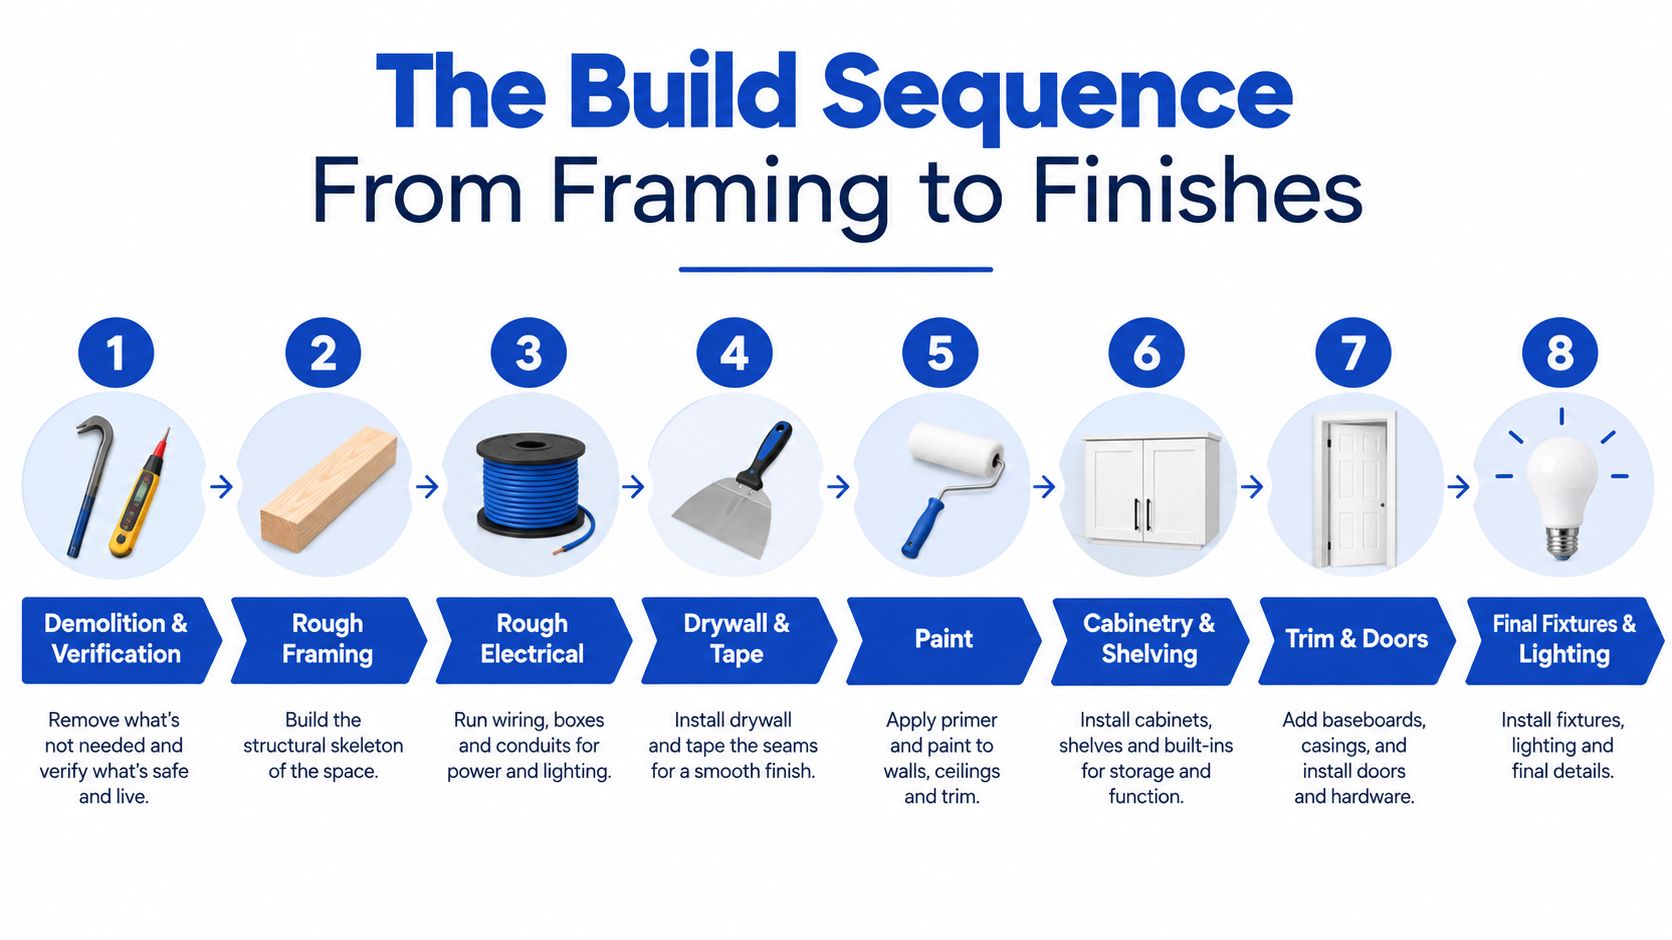
A pantry build should move in a strict order because every finished surface can hide a future repair. The sequence starts with verification, not demolition. Photograph the existing walls, identify studs, shut off circuits that may run behind the work area, and check whether plumbing, ductwork, or HVAC lines cross the proposed space.
Open only what you can safely verify. If you're removing a wall, determine whether it carries load before cutting into it. If you're closing a closet or creating a new opening, confirm the framing plan before materials arrive.
Follow the construction order
Prevent the two expensive tear-outs
The first common sequencing error is finishing walls before electrical work has been inspected or tested. If a circuit fails, or an inspector requires a correction, finished drywall and paint may need to come back out.
The second is installing shelves before paint. Even careful installers can scuff a wall while leveling a long run or fastening a bracket. Paint first, allow it to cure, then install the storage system and finish small touch-ups around trim.
Practical rule: Build the structure, complete the concealed systems, finish the walls, and only then install the storage that makes the pantry useful.
Choose shelving based on load and adjustability. Fixed wood shelves look substantial but need strong supports. Wire shelving is economical and ventilated, yet small packages may tip or fall through. Bracket-and-pin systems offer flexibility, while built-ins provide the cleanest finish at a higher labor cost. Add blocking wherever you may later install heavy shelves, a countertop, or wall-mounted equipment.
Air-seal gaps around doors and trim, especially when the pantry connects to a cooler or less conditioned area. A consistent relationship with the kitchen helps protect stored goods and keeps the room from feeling like an unfinished utility closet.
Cost and Time Estimates by Scope
A pantry estimate is only useful when it describes the work included. A shelf kit and a framed room shouldn't appear in the same generic “pantry build” range. Public cost guides show broad estimates from about $1,500 to $10,000, with premium projects reaching $25,000, while independent estimates place a basic shelving-only project around $250 to $1,500 and a new build involving framing, drywall, electrical, and structural work at $10,000 to $20,000 or more (Angi pantry cost guidance).
| Scope Tier | Material Cost | Labor Cost | Total Range | Timeline |
|---|---|---|---|---|
| Reach-in wire shelving | $150 to $400 | Primarily DIY or short installation labor | $250 to $1,500 | Half day to a weekend |
| Built-in closet conversion | Shelving, drywall, trim, and finish materials | Carpentry and finishing labor | $800 to $3,000 | Two to several days |
| Walk-in conversion | Framing, door, electrical, drywall, and shelving | Multiple trades | $3,000 to $8,500 | Several days to two weeks |
| Framed room or custom conversion | Cabinetry, counter, electrical, framing, and finishes | Contractor and trade labor | $10,000 to $25,000 or more | Multiple weeks |
The split between materials and labor changes sharply as the scope rises. A wire system is mostly product and installation time. A room conversion pays for coordination, framing, electrical, drywall finishing, trim, inspections, and the time required to correct existing conditions.
Identify the budget escalators
A dedicated 20-amp circuit can add $350 to $600, a ventilation duct run can add $400 to $900, and permit pulls can add $200 to $900, depending on jurisdiction. These amounts come from the planning estimates supplied for this project, so treat them as scope allowances rather than universal bids.
Regional labor also matters. The planning guidance identifies coastal-metro labor multipliers of 1.2x to 1.6x compared with a baseline market, which can move an apparently modest conversion into a contractor-led remodel.
Keep a hidden-cost checklist beside the estimate. Include door and casing changes, baseboard replacement, paint touch-up, floor repair where a wall was removed, disposal fees, delivery, countertop fabrication, and any electrical corrections. If the estimate has no line for these items, ask whether they're excluded or unpriced.
Electrical, Lighting, and Ventilation
Drywall hides the decisions that are hardest to change later. Plan the pantry's electrical, lighting, and ventilation before the framing is closed, even if the first version of the room only needs shelves.
For a simple storage pantry, map the lighting circuit and receptacle locations first. If the room will include a microwave, coffee station, or future wine fridge, plan a separate appliance circuit and confirm the load with the electrician. Small-appliance planning should be checked against NEC 210.52, while local requirements still control the final installation.
Build a lighting layer, not a single bright spot
A central fixture may light the aisle while leaving deep shelves in shadow. Recessed LED downlights on a dimmer create general illumination, and under-shelf LED strips help reveal containers tucked beneath an upper shelf. A 3000K color temperature and 90+ CRI are practical choices when you want food colors and labels to look natural, but the electrician should confirm product compatibility and local requirements.
A motion sensor is particularly useful in a walk-in pantry. It keeps both hands free while unloading groceries and avoids the familiar problem of leaving a hidden light switched on.
Use outlet placement to match the actual work zone. Countertop appliances need receptacles where cords won't cross the aisle, and a future appliance location should be identified before shelves become permanent. If you're unsure whether the work calls for a dedicated lighting installation electrician, ask for a scope review before drywall, not after the room is painted.
Plan ventilation before the chase disappears
Ventilation becomes a construction issue when the pantry includes a vented range, microwave hood, or electric resistance appliance. A duct must reach the exterior, and the route may require framing space, firestopping, and a suitable termination. In unconditioned spaces, the planning notes call for rigid metal duct material under IRC guidance. Don't assume a recirculating hood solves every ventilation requirement.
Even without a ducted appliance, avoid sealing a damp, poorly conditioned closet around food storage. The room should remain accessible for cleaning, and any HVAC connection should be planned with a qualified professional so airflow and temperature remain appropriate for the house.
Permits and When to Hire a Verified Pro
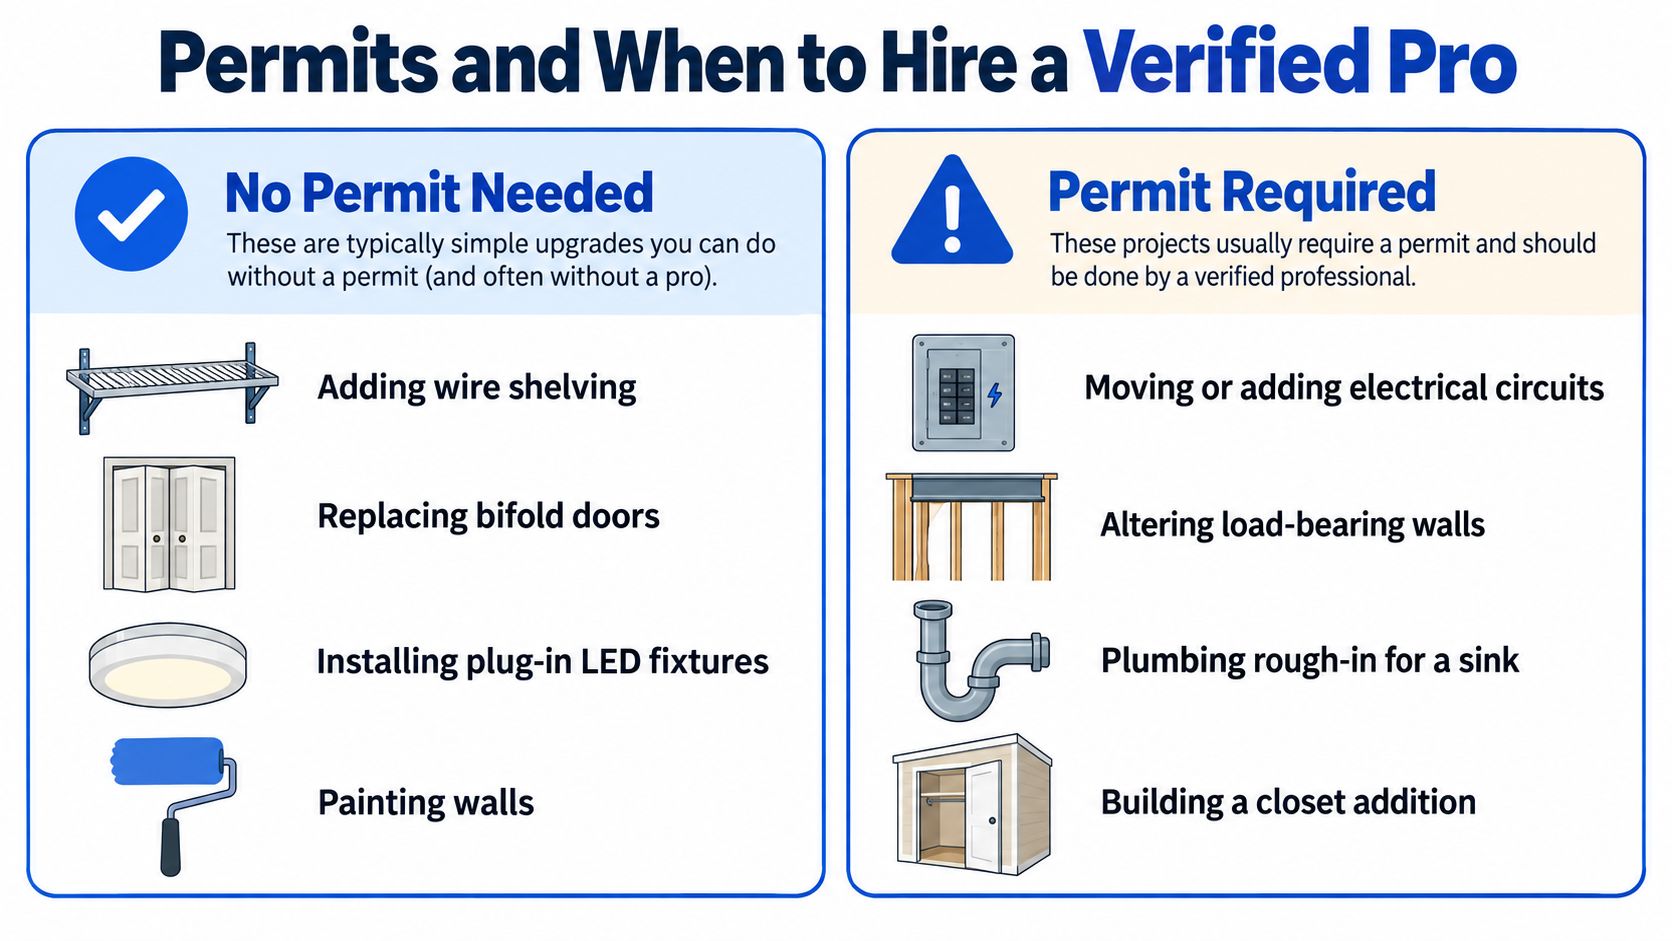
Cosmetic storage work and construction work belong in different permit conversations. Adding wire shelving, replacing bifold doors, painting, or installing plug-in LED fixtures is generally a simpler category than framing a wall, moving a doorway, adding a circuit, installing a window, or tying into HVAC.
Local rules vary, so confirm with the building department before opening walls. A useful overview of the terminology and process is this guide to what a building permit covers, but your jurisdiction's office decides which work requires approval.
Prepare the permit packet
A jurisdiction may ask for:
The permit itself isn't the only test. The work must also be installed correctly, inspected where required, and documented for future owners or repairs.
Know when a pro is the economical choice
Hire out structural changes, new circuits, plumbing rough-in, exterior openings, ductwork, or any work that requires inspection and trade coordination. Verify the contractor's license through the state contractor board, request current general liability and workers' compensation certificates, and ask for three references from recent pantry or kitchen remodels.
Require an itemized bid broken down by trade. The estimate should separate framing, electrical, drywall, paint, shelving, doors, trim, permits, and disposal. In many states, work beyond minor repairs requires a licensed contractor, so don't treat a verbal promise to “handle the permit later” as a complete plan.
Common Mistakes and the DIY Versus Hire Decision
The most expensive pantry mistakes usually begin as attempts to maximize capacity. A shelf that's too deep can hold more in theory but hide the products you already own. An aisle that's too narrow may leave enough room for a drawing but not enough room to turn, unload groceries, or open a cabinet comfortably.
Watch for these failure points:
Choose the honest level of help
Ask yourself three questions. Are you changing structure or only replacing storage? Are you touching electrical, HVAC, or plumbing? Do you expect a furniture-grade finish with aligned trim and durable built-ins?
If the answers are “no,” a careful DIY installation may be sensible. If one system needs professional work but the shelving and paint are within your skills, use a partial-hire approach. Have the licensed trade handle concealed systems and inspections, then complete finish work yourself. If the project changes walls, openings, utilities, or the exterior, a licensed general contractor is usually the safer coordinator.
The middle option often protects the budget without pretending every task is equally risky. For a clearer distinction between smaller repairs and broader construction responsibility, compare the roles in this handyman versus contractor guide.
If you're ready to build a pantry, use HomeProBadge to find verified home service professionals, review licensing and insurance proof, and compare documented project work before inviting someone to quote the job. Visit HomeProBadge to search for a qualified contractor, electrician, carpenter, or handyman who matches your pantry's actual scope.