



What if the best drywall texture for a room has less to do with current style and more to do with how the surface will be lit, repaired, cleaned, and lived with? Different drywall textures change a room's visual scale, the way shadows move across a wall, the amount of preparation a finisher must complete, and how easily a future patch can disappear. A subtle spray texture may conceal minor imperfections efficiently, while a smooth finish can make a premium room look crisp but expose every flaw.
The practical comparison is straightforward. For each finish, look at its visual character, best room applications, advantages, drawbacks, application method, relative labor demand, maintenance routine, repairability, and whether DIY work is realistic. Older popcorn ceilings require a safety decision before removal, while smooth and decorative finishes demand very different levels of surface preparation and control.
Before buying compound or spray equipment, review this budget drywall tools guide. The right tools matter, but matching the finish to the room matters more.
1. Popcorn Texture
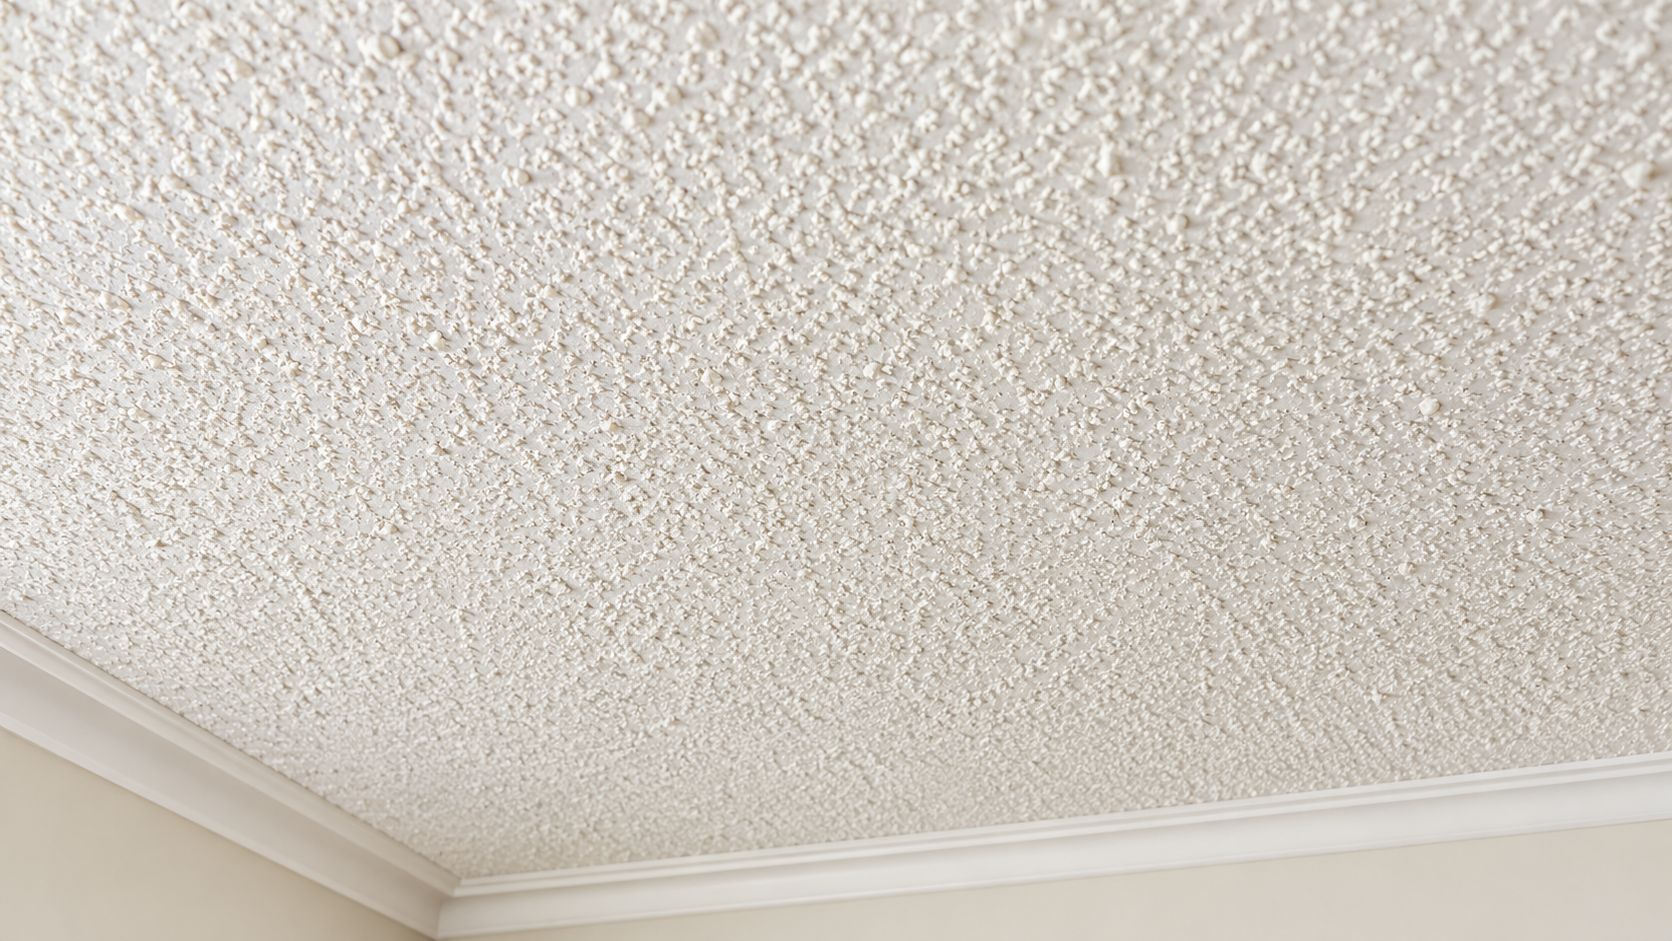
Popcorn texture is a spray-applied, heavily raised ceiling finish made with joint compound or texture material and acoustic aggregates. Its uneven surface hides seams and small ceiling defects, absorbs some sound, and avoids the labor of producing a perfectly flat overhead plane. That made it especially practical for basements, utility rooms, garages, rental properties, and large-scale construction.
The finish has important historical context. Spray-applied acoustic texture entered residential construction in the late 1940s and became common from the 1950s through the 1980s, with some estimates placing it in more than 40 million U.S. homes built during that era, as documented by this history of popcorn ceilings. The U.S. EPA's asbestos-related action in 1978 helped drive reformulation, and manufacturers shifted ingredients during the late 1970s and early 1980s.
Where it works and where it fails
A popcorn ceiling can still make sense when you're matching an existing surface, improving acoustic softness in a basement, or concealing a ceiling that would require extensive correction. It's a poor choice for a minimalist living room, a high-end kitchen, or any space where owners want easy wiping and a clean modern profile.
Safety first: Many textured ceilings installed before 1990 can still contain asbestos. Test before disturbing the material, and use qualified professionals when removal or invasive repair is required.
Protect floors, fixtures, and furniture with plastic sheeting. Prime the ceiling for consistent adhesion, spray in controlled passes, and photograph the finished surface from several angles for a contractor portfolio. Clients comparing bids can also use HomeProBadge's contractor selection guidance to evaluate qualifications and proof of work. For a repair rather than full removal, use a tested seamless ceiling patch method and expect the surrounding pattern and lighting to affect the result.
2. Orange Peel Texture
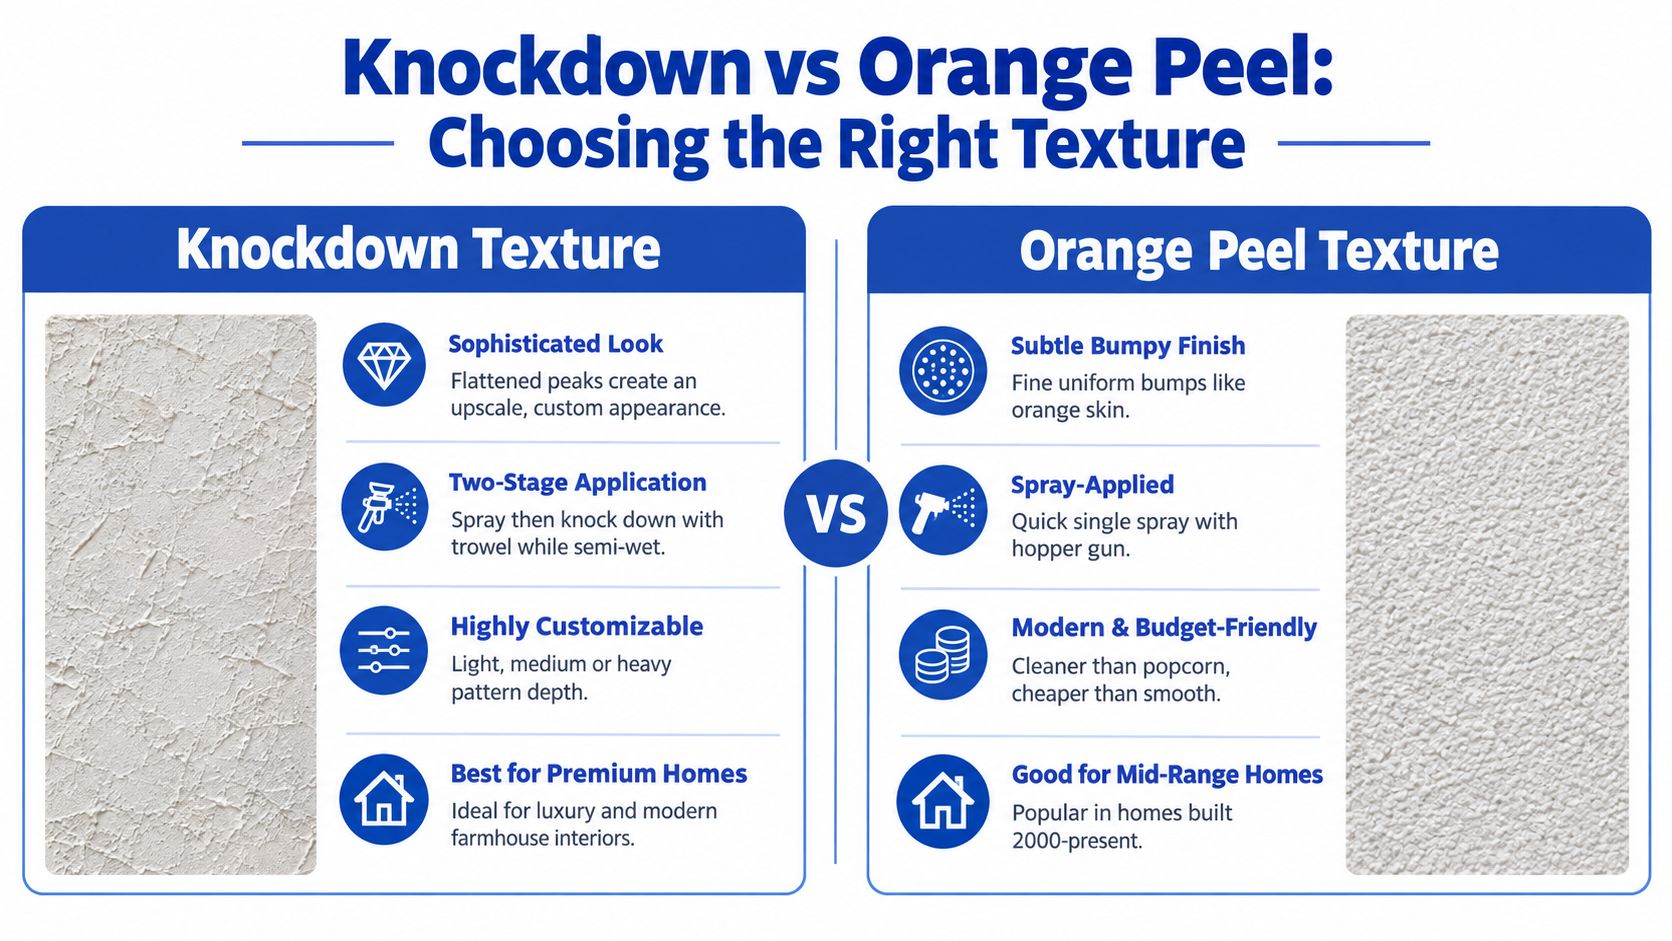
Orange peel suits projects where the wall needs modest visual character, practical coverage, and manageable future repairs. It forms small, rounded bumps, softening drywall imperfections without the heavy profile associated with popcorn. Contractors spray diluted joint compound or a ready-made coating, then adjust consistency, pressure, nozzle, and distance to control the pattern.
Use it in living rooms, bedrooms, rental apartments, hallways, and mid-range residential work. The finish gives walls a completed appearance while disguising minor taping and sanding variations. Because the pattern is produced with a sprayer, ordinary wall repairs usually blend more predictably than hand-created decorative textures.
Control the spray, not just the material
The main challenge is consistency. Small changes in viscosity or spray technique can create visible differences across one wall, especially under side lighting. Test on scrap drywall first, then build the profile with light, overlapping coats instead of one heavy pass.
A commercially available orange peel and knockdown coating lists 37%±2% volume solids, 48%±2% weight solids, a density of 9.1 pounds per gallon, coverage of roughly 20 to 40 square feet per can, and a stated dry time of one to two hours, with paint readiness after 60 minutes, according to the manufacturer's product specification sheet. These specifications show why spray texture can suit small repairs and short-turnaround work, although substrate condition and application conditions affect the result.
For homeowners, a small patch is realistic with careful masking, practice, and controlled equipment settings. A full room demands steadier technique and more preparation. Keep the sprayer at a consistent distance, thin the compound until it atomizes properly, and overlap each pass enough to avoid gaps without creating dense spots.
Photograph completed work from straight-on and side-lit angles. That proof helps prospective clients judge pattern consistency, repair blending, and workmanship rather than relying on color alone.
3. Knockdown Texture
What should a knockdown finish accomplish in the room? It adds controlled visual movement while keeping the profile lower and easier to live with than popcorn. Sprayed compound is flattened before it fully dries, leaving a low-relief, broken pattern with more character than orange peel and less bulk than popcorn. The finish suits formal living rooms, primary bedrooms, custom homes, contemporary interiors, and apartment projects where the owner wants texture without a dated appearance.
Application depends on timing and coordination. If the spray sits too long, the surface starts drying before the knife reaches it. If the knife moves too early, it smears the compound instead of leaving distinct flattened islands. Crews should work in consistent sections and agree on the tacky stage before starting.
Use a 10 to 12 inch knockdown knife to control broad passes. Keep the blade angle steady, and adjust section size so the sprayed material reaches the same working stage across the wall. Small variations prevent a mechanically repeated pattern. Large changes in spray density or pressure make repairs visible.
The finish offers useful trade-offs:
Practical rule: Match the existing profile before matching the paint color. Correct color over the wrong texture still produces visible shadows.
For a single patch, widen and feather the underlying compound, then reproduce the surrounding density instead of making a perfect isolated pattern. The same preparation principles used to fix drywall patches with orange peel can help, although knockdown requires separate control of spray timing and knife pressure.
Contractors should photograph completed work in diffuse and directional light. Straight-on images show pattern consistency, while side lighting exposes ridges, gaps, and poor blending. Keep verified before-and-after documentation with the portfolio, and direct prospective clients to license verification for contractors when they want to check credentials.
This demonstration shows how spray timing and knife movement change the final surface.
4. Smooth Drywall Finish
How much visual precision can the room support? A smooth drywall finish removes texture from the design, so every joint, fastener, corner, and repair becomes easier to see. A Level 5 finish requires careful joint treatment, several coats of compound, broad feathering, sanding, and inspection before paint or wallpaper. Under ordinary and directional lighting, the surface should read as one continuous plane.
This finish fits luxury homes, premium offices, hotels, medical spaces, and custom interiors. It also works when adjoining rooms have different textures and the renovation needs one consistent surface. Glossy paint and strong window light reveal flaws quickly, so inspect the wall before applying the topcoat.
Choose smooth walls for control, not forgiveness
Smooth drywall is easy to dust and wipe, yet maintenance problems can stand out more clearly. Fingerprints, scuffs, fastener movement, and uneven sheen remain visible because there is no pattern to break up the surface. Repairs can require more labor than expected. The finisher may need to skim a broad area, sand carefully, prime, and repaint the full plane to prevent flashing.
Inspect the wall with strong LED lighting from several directions. Keep temperature and humidity stable while the compound dries, then use fine abrasive paper for final refinement. Compound quality affects workability, but technique has greater influence. A premium product cannot compensate for poor framing, rushed drying, or narrow feathering.
For a repair, match the surrounding plane rather than creating a small, isolated smooth spot. Blend the compound beyond the damaged area, then prime and repaint as needed to keep sheen consistent.
Before hiring, compare experience and scope with a guide to how much painters charge. Ask the finisher for smooth-wall examples photographed under side lighting. Professionals should document detailed before-and-after projects, because finished photos may look simple even when the work required careful preparation and substantial labor. DIY homeowners should first test the repair method on scrap drywall or an inconspicuous area.
5. Skip Trowel Texture
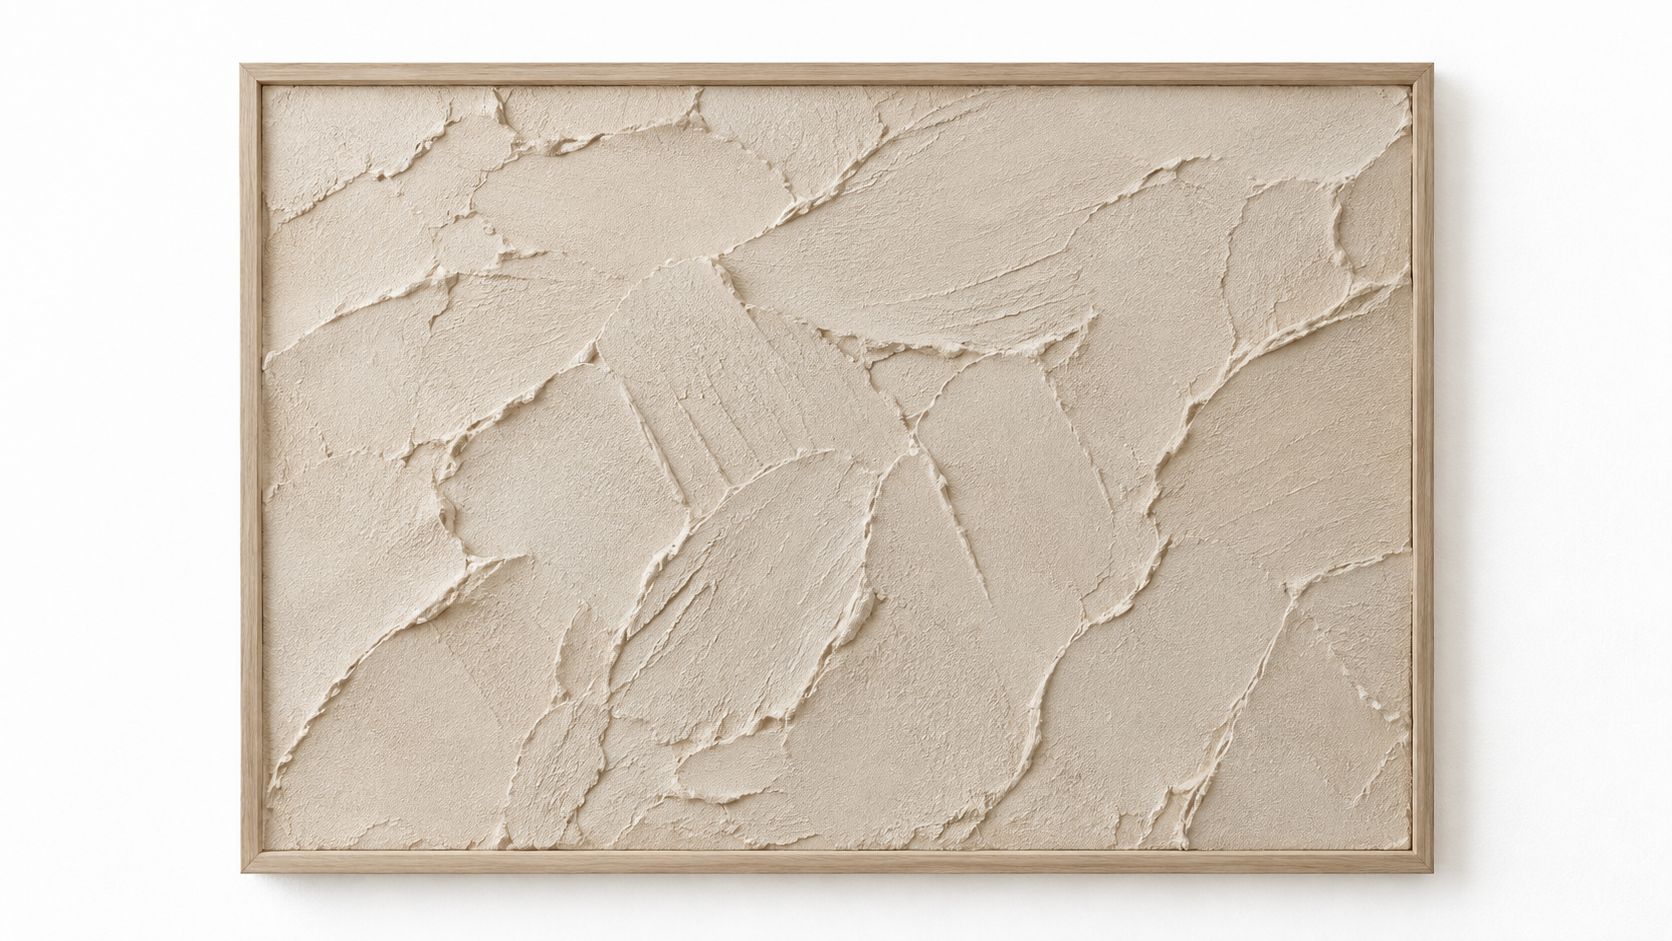
Skip trowel creates a hand-applied, irregular pattern by dragging a loaded trowel across joint compound. Part of the blade contacts the wall while the rest skips over it, leaving visible movement and shallow raised areas. The finish brings handcrafted character to farmhouse, rustic, Mediterranean, Tuscan, and Southwestern interiors.
The pattern depends on pressure, blade angle, compound consistency, and stroke direction. That control gives each wall a distinct surface, but it also makes repairs demanding. A patch must match the surrounding movement, not reproduce the same amount of compound. Poor blending can make the repair stand out under side lighting.
Match the texture to the room and the work involved
Use skip trowel in a dining room with warm plaster-like walls, a farmhouse renovation, a cabin, or a boutique hospitality space where surface character supports the design. It can soften minor drywall irregularities, yet its uneven profile may feel out of place in a minimalist home or narrow hallway with strong directional light. Homeowners planning a future sale should also consider whether the finish will limit buyers' decorating choices.
Use a broad trowel, keep the compound loose enough to move without tearing, and vary the skipped pattern deliberately. Identical arcs repeated across a wall make a hand texture look stamped. Allow enough drying time before judging the finish, since changes in sheen can make shallow ridges appear uneven.
Contractors should present this work with close-ups, wide room photographs, and application time-lapse footage. Show the surface from several angles because a front-facing image can hide its depth. Homeowners should inspect a completed room, not only a small sample. Large walls reveal pattern consistency, repair quality, and how lighting changes the texture. A practical visual reference is this textured plaster artwork.
6. Spray-Applied Mud Texture
Spray-applied mud texture, also called California texture or splatter texture, covers drywall with thinned joint compound sprayed through a hopper. The finish keeps its raised peaks instead of being flattened. Spray pressure, material consistency, nozzle choice, and wall distance determine the size and density of the random pattern.
Its practical strength is broad, repeatable coverage. Crews commonly use it in contemporary homes, multi-unit buildings, living areas, bedrooms, and modern commercial spaces. The light relief can soften ordinary drywall variation without creating the heavier character of a hand-built finish.
Consistency starts before the first pass
Protect the room before loading the hopper. Mask floors, trim, windows, cabinets, and fixtures, then wear suitable respiratory protection. Test the mixture and spray pattern on scrap board. A small adjustment to pressure or material thickness can change the finished appearance across an entire wall.
Use steady movement and change one setting at a time. If the texture becomes too heavy, altering pressure and mixture together makes the cause difficult to identify. Record the mix and equipment settings after an approved test, particularly for rental or commercial properties that may need matching repairs later.
Repairs remain manageable only when the original settings are documented. Even then, a patched area may show a different density or sheen, so homeowners should keep leftover material information and evaluate the wall under its normal lighting.
Contractors should show wide room photographs, close-ups, and images from different lighting angles in their portfolios. Include protected edges and consistent coverage, not only finished walls. That proof lets prospective clients judge application control and cleanup quality instead of relying on a general claim about texture work.
7. Swirl Texture
Swirl texture makes the wall part of the room's design. A finisher applies compound, then forms circular or curved marks with a sponge, brush, or specialty tool. Changes in direction, spacing, and overlap can produce an artistic, retro, playful, or intentionally eclectic appearance.
Use it where visual character matters, such as art studios, creative workspaces, children's rooms, boutique retail spaces, galleries, and hospitality interiors with a defined concept. It also suits a feature wall when the goal is personality without heavy relief throughout the room. The trade-off is limited flexibility. Swirls make a stronger stylistic statement than orange peel or a light knockdown finish, so they may complicate later decorating changes.
Control the repeat before covering the wall
The pattern should have a consistent scale and controlled overlap. Slight variation keeps it from looking mechanical, while a repeatable hand motion prevents random gaps and crowded areas. Build a sample board first, then review it beside the intended furniture, artwork, trim, and room lighting. A small adjustment in spacing can change the wall's visual weight.
Inspect the sample in both daylight and artificial light. Swirls create directional shadows, so a pattern that looks restrained under diffuse light may appear busy from another angle. For repairs, keep the approved sample or photograph, since matching the movement is harder than matching material alone.
Contractors can present swirl work as a specialty service by showing the application process, close-up details, and completed rooms. Include clean transitions at corners, ceilings, outlets, and trim. A strong portfolio should demonstrate both expressive pattern work and the restraint needed to keep the finish from overwhelming the space.
8. Stomped or Splattered Texture
Does the room need a finish with visible movement and a handmade feel? Stomped or splattered texture uses a brush, broom, or specialty stomper to strike drywall compound into an irregular stippled surface. The tool and hand motion determine whether the result resembles scattered footprints, fine splashes, or broader organic marks. It fits farmhouse renovations, coastal homes, traditional interiors, rustic cottages, inns, and restaurants with a regional identity.
This finish can disguise minor visual variation in the substrate, but a heavier profile creates its own maintenance demands. Uneven peaks hold dust, and cleaning requires care around the raised areas. Spot repairs are also difficult when the original tool, compound consistency, and strike pattern were not recorded.
Set the profile before covering the wall
Apply the texture in manageable sections and keep the compound at a consistent stage of dryness. Vary the striking angle to prevent visible rows, while controlling pressure so heavy patches do not sit beside thin areas. A full-scale scrap panel gives the homeowner and contractor a clear reference for pattern size, depth, and spacing.
Use directional lighting to photograph the finished surface. It exposes depth, uneven coverage, and pattern variation more clearly than flat lighting. Contractors presenting this work should show a wide room view, close-up details, and before-and-after images. A time-lapse can document the hand technique, while the completed room proves whether the texture supports the design instead of dominating it.
Match the profile to the room's proportions and lighting. A soft irregular pattern can suit a coastal cottage, while the same depth may make a narrow modern corridor feel crowded. Record the approved sample, tool, and mixture so future repairs have a reliable starting point.
Comparison of 8 Drywall Textures
| Texture | Implementation Complexity 🔄 | Resource & Time ⚡ | Expected Outcomes ⭐ / Impact 📊 | Ideal Use Cases 💡 | Key Advantages |
|---|---|---|---|---|---|
| Popcorn Texture (Acoustic Ceiling Texture) | Low 🔄, spray-applied, simple setup | Low ⚡, fast application; messy cleanup | Moderate ⭐⭐, excellent sound absorption; hides defects 📊 | Basements, utility rooms, commercial drop ceilings, rentals | Cost-effective; superior acoustic dampening; covers services quickly |
| Orange Peel Texture | Medium 🔄, spray technique required for consistency | Low–Medium ⚡, single spray, quick patterning | Moderate–High ⭐⭐⭐, modern look; good resale appeal 📊 | Mid-range homes, living rooms, rental apartments | Cleaner appearance than popcorn; easier to repair and clean |
| Knockdown Texture | High 🔄, two-stage process; timing critical | Medium–High ⚡, spray then knockdown; more labor | High ⭐⭐⭐, upscale, customizable finish; strong resale impact 📊 | High-end homes, modern farmhouse, custom projects | Sophisticated aesthetic; versatile depths; good balance of coverage & appeal |
| Smooth Drywall Finish (Level 5) | Very High 🔄, multiple coats, expert finishing | High ⚡ (slow), labor- and time-intensive; premium materials | Highest ⭐⭐⭐⭐, flawless surface ideal for paint/wallpaper; max resale 📊 | Luxury residences, hotels, premium commercial interiors | Perfectly smooth finish; accepts any paint/finish; premium market value |
| Skip Trowel Texture | High 🔄, hand-troweled, artisanal skill required | Medium ⚡, hand application; variable pace | High ⭐⭐⭐, distinctive rustic/artisanal look; strong visual impact 📊 | Farmhouse, Mediterranean, rustic renovations, boutique venues | Unique handcrafted appearance; forgiving of minor imperfections |
| Spray-Applied Mud (California Texture) | Medium 🔄, spray setup and skill for consistency | Low–Medium ⚡, single-pass spray; efficient for large areas | Moderate–High ⭐⭐⭐, clean, contemporary texture; good coverage 📊 | New construction in Western U.S., modern homes, multi-unit builds | Fast, consistent, modern appearance; cost-effective for volume work |
| Swirl Texture | High 🔄, artistic technique with specialized tools | Medium ⚡, quicker than smooth but skill-dependent | Moderate ⭐⭐, decorative, niche appeal; visual focal point 📊 | Art studios, eclectic/bohemian homes, boutique retail | Highly decorative and unique; strong design statement |
| Stomped / Splattered Texture | Medium 🔄, tool technique (stomper/broom) | Low–Medium ⚡, relatively quick; section work needed | Moderate ⭐⭐, rustic, textured surface that hides flaws 📊 | Farmhouse, coastal, traditional interiors, inns | Rustic authentic aesthetic; hides imperfections well; affordable |
Match the Texture to the Room and the Risk
Choosing among different drywall textures is easier when you separate appearance from consequences. A finish isn't only a decorative surface. It determines how much preparation the wall needs, how visible future damage will be, how difficult cleaning becomes, and whether a contractor can reproduce the pattern after a repair.
Choose smooth drywall when the priority is a premium, paint-ready surface with clean lines. It works especially well with modern interiors, wallpaper, and carefully controlled lighting, but it demands the highest standard of flatness. Direct light can reveal joints, sanding marks, and uneven transitions that a textured finish would soften. Budget for experienced finishing rather than assuming the absence of texture makes the project simple.
Choose orange peel or California texture when you need efficient, subtle coverage for ordinary residential walls, apartments, bedrooms, and living spaces. These finishes can conceal minor imperfections without dominating the room, and their spray-based application suits repeat work. Orange peel is usually easier to match than heavier or more artistic textures, provided the contractor records the material consistency and equipment settings.
Choose knockdown when you want a refined compromise. It adds dimension and concealment while looking more controlled than popcorn or a heavy stomped finish. The trade-off is timing. A finisher must spray and flatten each section at the right stage, so rushed work often produces uneven peaks or obvious repair boundaries.
Use popcorn mainly when an existing ceiling, acoustic requirement, or concealment need justifies it. Don't disturb an older installation casually. Textured ceilings installed before 1990 may contain asbestos, so testing and appropriate professional handling come before removal or aggressive scraping.
Decorative finishes deserve a more deliberate decision. Skip trowel, swirl, and stomped textures can give a room a strong identity, but they won't appeal equally to every future owner and can make invisible repairs harder. They're best when the style is intentional, the sample has been approved under the room's actual lighting, and the finisher has demonstrated similar work.
Before committing, make a sample board and inspect it from multiple angles and at different times of day. Ask how the surface will be cleaned, how a future patch will be matched, and whether the contractor expects to retexture a full wall or ceiling rather than hide one isolated repair. Small texture-matching jobs often fall around $250 to $900, while larger blending or full-wall retexturing can reach $900 to $2,500 or more, and overhead matching can cost more because of labor and repainting complexity, according to recent drywall texture-matching cost guidance. Smooth finishes can also be unexpectedly costly because skim coating and sanding are unforgiving.
Contractors should document proof of work with clear before-and-after images, close-ups, room-wide photographs, and lighting notes. A verified public profile through HomeProBadge gives homeowners a place to review credentials and see project evidence before they hire. That matters particularly for spraying, artistic hand textures, difficult ceiling repairs, and any work involving older materials.
HomeProBadge helps drywall and painting professionals present verified credentials, real proof-of-work, structured reviews, and a public profile homeowners can evaluate before hiring. Create a profile to document your texture projects with credible before-and-after evidence and connect your workmanship to a stronger local reputation.