



You've got dinner dishes piled beside the sink, cloudy water over the drain, and a disposal that either hums or does nothing. You flip the switch again, hoping it'll catch. Don't keep trying. A stalled motor needs diagnosis, not repeated starts.
A broken garbage disposal doesn't automatically need replacing. The fault might be a jam, interrupted power, a leaking connection, or a blockage beyond the appliance. Start by separating those problems, then compare the price of the actual repair with a complete replacement quote.
Match Your Symptom to the Likely Fault
| Symptom | Likely cause | First check | Call a pro when |
|---|---|---|---|
| No power, no hum at all | Tripped reset, dead breaker, switch fault, or loose wiring | Check switch position, reset status, and breaker panel | Breaker trips again or the outlet smells burnt |
| Hums but the flywheel will not turn | Jammed grinding plate | Disconnect power, then use the specified disposer wrench | Plate stays stuck or overload trips again |
| Runs but grinds slowly or leaves chunks | Partial jam, worn grinding components, or restricted discharge | Inspect for obstruction with power disconnected; check discharge tube | Trouble persists after clearing |
| Water leaking from the bottom of the body | Failed internal seal or housing | Dry the exterior and identify the first wet seam | Body leakage is confirmed |
| Leak at the sink flange or drain connection | Loose mount, deteriorated seal, or loose fitting | Inspect the mounting assembly and connection gaskets | Water reaches wiring or fittings are corroded |
| Gurgling, slow drain, or sewer smell | Restricted P-trap or downstream drain; possibly another drainage fault | Inspect and clean the trap safely | Backups recur after the trap is clear |
| Completely silent, no reset trip | Failed switch, outlet, wiring, or motor | Check accessible power controls without opening wiring | Electrical or motor failure is suspected |
| Loud banging or rattling | Foreign object such as a spoon or bottle cap | Disconnect power, then remove visible objects with tongs | Noise continues after removal |
Read the table as triage, not a diagnosis. A hum suggests the motor is receiving power but can't rotate. Silence leaves several possibilities open, including a power interruption rather than a failed motor.
A plumber-feedback breakdown published by Northern Services attributes approximately 35% of reported problems to jams or clogs and 25% to leaks. Those are directional service observations, not national failure rates. They support checking obstructions and connections before buying an appliance.
Check the circuit before condemning the motor
The quick screening order is power, reset status, then jam inspection. That doesn't mean repeatedly pressing the reset. If the unit hums or an obstruction is suspected, clear the mechanical problem before attempting a restart.
For a leak, location matters more than puddle size. Stultz Plumbing's resource on how to repair a leaking kitchen disposal is useful when distinguishing an external connection problem from leakage through the appliance body.
A disposal that runs smoothly while the basin backs up needs a drain investigation, not an automatic appliance replacement.
Listen to the grinding sound separately from the drainage. Gurgling or standing water after otherwise normal operation points toward the trap, discharge pipe, or shared drain.
Cut the Power, Clear the Jam and Reset
The sink is full, the disposal is silent, and you're tempted to reach through the splash guard. Stop at the power supply first. A wall switch alone isn't enough protection against someone turning it on while you're working.
Gather a flashlight, manufacturer-specified disposer wrench, long-nose pliers or tongs, gloves, towels, and a bucket. Take a phone photo of the connections before moving anything. Gloves protect against dirty surfaces, but they don't make reaching inside safe.
Isolate the unit before inspecting it
Free the mechanism without forcing it
Restart rule: Clear the obstruction before resetting. A reset restores the motor's opportunity to run; it doesn't remove whatever stopped it.
If the unit runs but the basin still holds water, stop feeding it scraps. Engle Services' guide to clearing a clogged kitchen sink addresses the drainage side of that problem. Don't loosen drain fittings if chemical cleaner is sitting in the basin or trap.
End homeowner troubleshooting if the overload trips again, the breaker retrips, the outlet looks scorched, or the appliance remains silent after accessible power checks. Smoke, a burning smell, or water near wiring requires professional attention, not another test.
Fixing Leaks and Slow Drains Beyond the Motor
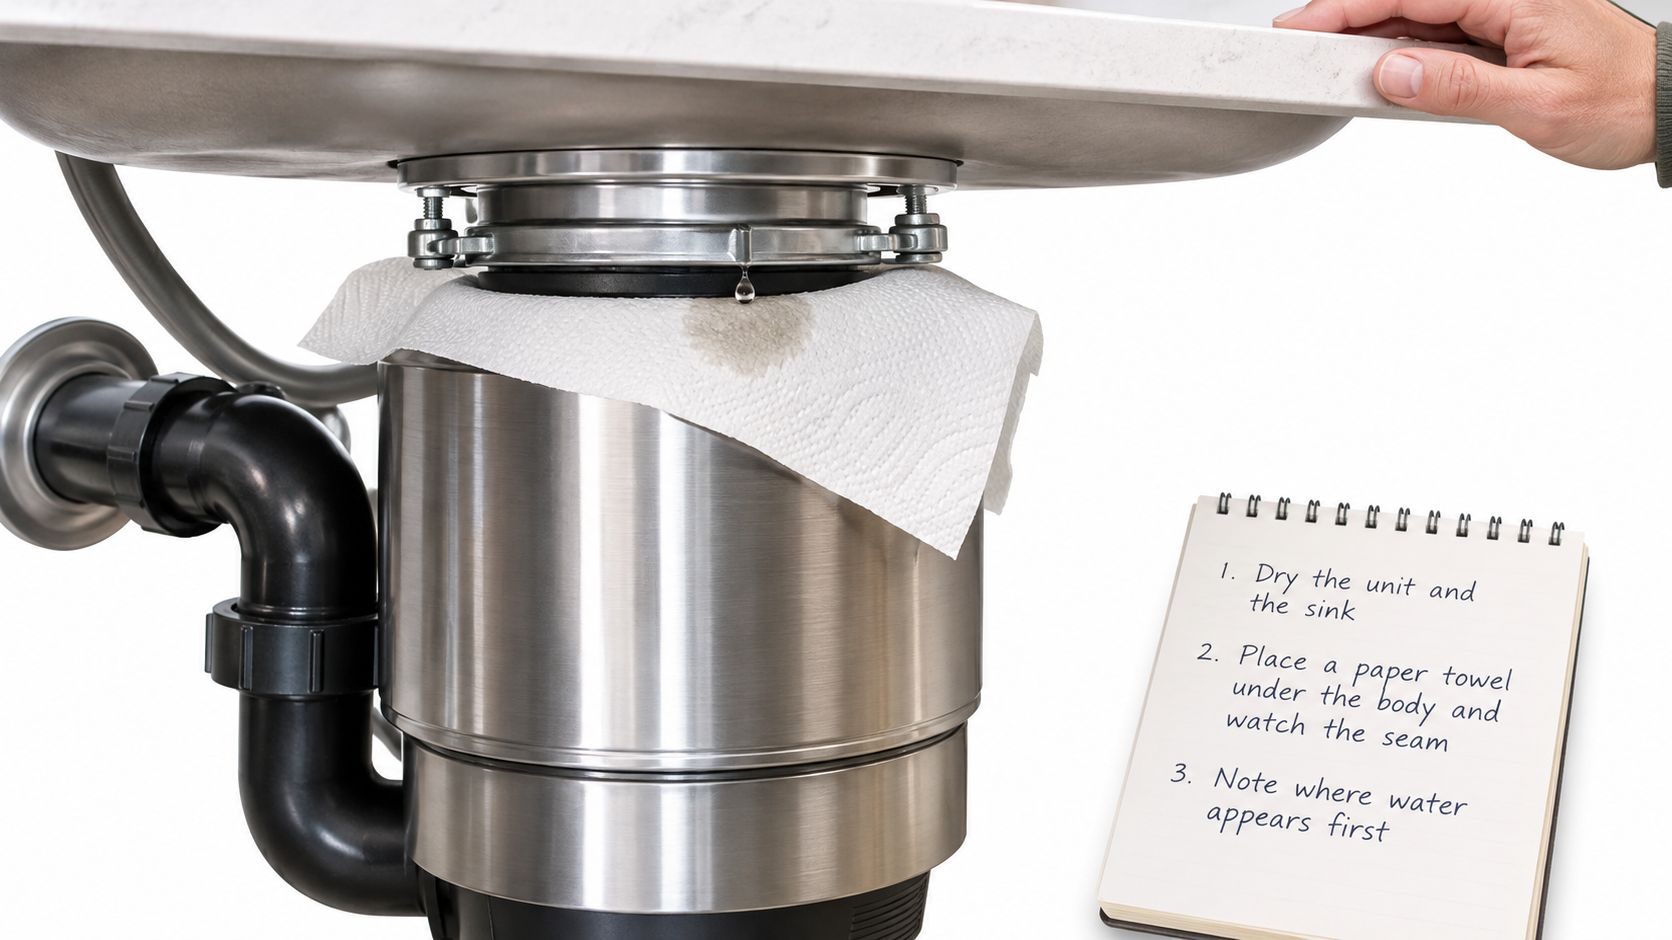
Disconnect power, dry the sink underside and disposal exterior, and place a dry paper towel below the unit. Introduce a little water only if the electrical area is dry and safe, then watch where moisture appears first. Water can travel down the housing and make a flange leak look like a failed bottom seal.
Use the towel to reveal fresh drips rather than judging an old puddle.
Match the repair to the wet joint
Clear the trap before blaming the appliance
Put a bucket under the P-trap, loosen the slip nuts, and lower the trap carefully. Remove debris, inspect the washers, and reassemble without cross-threading or forcing misaligned pipes. The same washer-and-slip-joint principles appear in this guide to a bathroom sink drain pipe.
With the disposal still off, run water and inspect every disturbed connection. Warm water can help check flow, but it won't reliably clear a downstream blockage. If the clean trap still drains poorly, the branch drain needs investigation.
For a visual walkthrough of the under-sink work, review the demonstration before disconnecting fittings.
Repair or Replace Costs and the Decision Rule
| Job | When it fits |
|---|---|
| Reset and jam clearing, DIY | The included wrench is available and no replacement parts are needed |
| Diagnostic visit by a plumber or appliance technician | The fault remains uncertain. Ask whether the diagnostic charge is credited toward authorized work |
| Flange, sink gasket, or mounting ring fix | The leak starts at the top mounting assembly |
| Discharge tube or dishwasher inlet fitting | The leak is limited to a drain connection |
| Electrical fix involving switch, outlet, or wiring | A supply fault is confirmed and the appliance body is sound |
| Motor replacement | Parts are available and the complete repair compares favorably with a new unit |
| Full unit replacement, installed | Internal housing leakage or confirmed major failure makes repair unattractive |
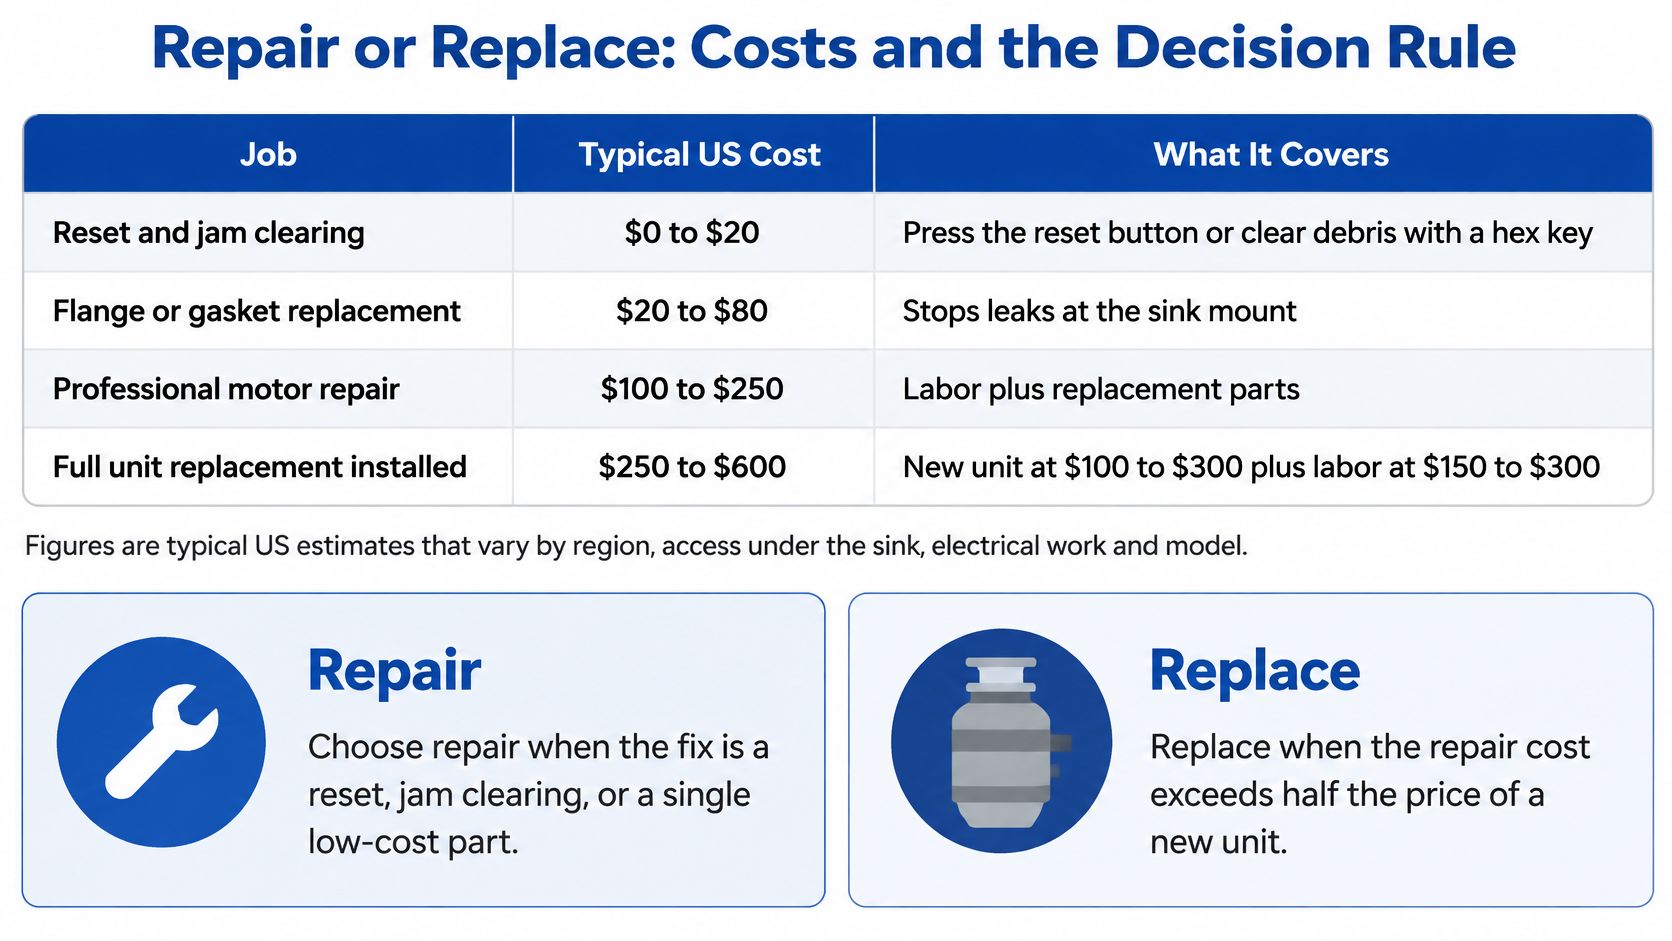
There is no universal price for this work. Access, plumbing alignment, electrical changes, and model choice all affect the total, as discussed in Plumbing Price Guide's repair discussion. Get written local ranges or fixed quotes for the diagnosed fault. An advertised starting price may not include the full job.
The chart below compares typical US cost ranges for repairing or replacing a disposal.
Compare complete jobs, not parts prices
I'd repair an isolated gasket, clamp, or supply-control fault when the disposal otherwise works and the quote is well below an equivalent installed replacement. Replacing a working unit won't clear a blocked branch drain, so compare the disposal quote with the condition of the trap and discharge line before deciding.
For confirmed internal leakage or motor failure, get a replacement quote before authorizing substantial disassembly. Motor service makes sense only when parts are available and the finished repair offers a meaningful saving.
Cost decision: Replacement wins when the complete repair costs as much as or more than an equivalent installed replacement. Below that point, weigh the savings against the unit's condition, warranty, and any unresolved faults.
A useful quote specifies the model, old-unit removal and disposal, mounting work, drain reconnection, electrical scope, and leak testing. Check whether the price assumes reuse of the existing flange or power cord. Different assumptions can change the comparison.
Buy for the installation and workload
Horsepower is only one consideration. Check cabinet clearance, outlet height, mounting compatibility, noise control, and the manufacturer's intended workload. A larger housing may require awkward plumbing changes under a crowded sink, while a smaller unit that fits the installation may avoid extra work.
Age alone does not establish a fault, and no fixed age or repair-price fraction applies to every unit. A modest repair can suit an otherwise sound appliance. Repeated repairs on a corroded, leaking assembly may make replacement the better value.
Replacing the Unit Step by Step
Replacement requires supporting a heavy appliance while disconnecting plumbing beneath a sink. Clear the cabinet, protect the floor, and arrange a helper if you can't safely hold and lower the unit. Don't let its weight hang from the drainpipe or electrical cable.
Follow the mounting system's instructions
Plumbing fit and electrical compatibility are separate checks. A mounting ring that fits doesn't establish that the wiring is suitable.
Check local plumbing permit requirements before starting. If the work involves altered wiring, a new circuit, or uncertain grounding, hand that portion to a licensed electrician.
Preventing the Next Jam or Leak
Should food scraps go through the disposal at all? That depends partly on what your municipality does with wastewater and which organics services it offers. A disposal is a convenience, not permission to send every leftover down the drain.
A 2025 peer-reviewed food-waste pathway study found that shredded food sent through sewers to treatment facilities with biogas production had the highest social value among the scenarios evaluated. That finding depends on treatment technology, sewer capacity, energy recovery, water use, and the alternative waste pathway. It doesn't establish that every household should use a disposal.
Reduce the load rather than testing its limits
Check local accepted-material rules, especially where sewer or septic guidance restricts disposal use. While a unit is out of service, use an accepted organics collection option where available. Don't push scraps through a stationary chamber and hope the drain carries them away.
When to Call a Verified Pro for Your Disposal
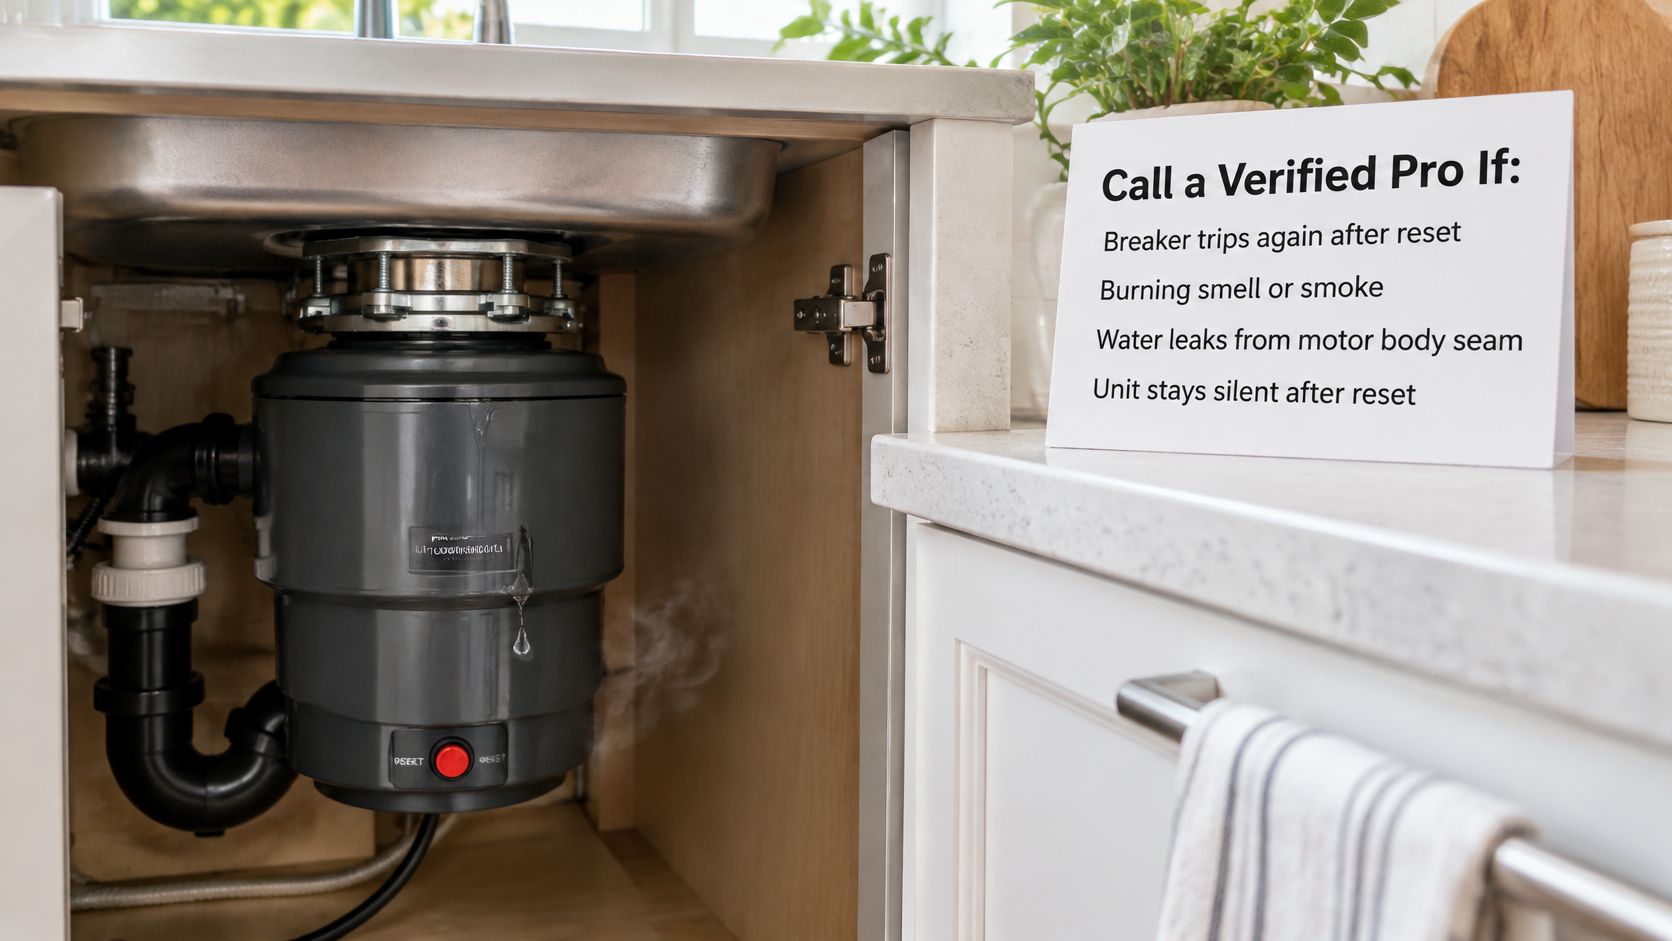
Leave the appliance off under these conditions. If there's active smoke or fire, move away and contact emergency services rather than investigating under the sink.
Treat visible leakage combined with electrical symptoms as a stop signal.
Ask for proof of diagnosis and qualifications
Check the licence required for the work in your jurisdiction, current liability insurance, and any claimed background screening. This guide to hiring a licensed and insured plumber explains the credential checks worth making before booking.
Request a written diagnosis that identifies jam, clog, external leak, internal leak, motor fault, or electrical fault. Ask for before-and-after photos showing the failure point and corrected connections, not merely a picture of a new appliance.
Compare written quotes with the same scope. A cheap unit-only offer isn't equivalent to a complete installation with drain alignment, electrical work, and testing included. Choose the contractor who explains why the proposed work solves the fault.
HomeProBadge helps homeowners find verified service professionals and review credentials, real project photos, and proof of completed work. Visit HomeProBadge to find a professional who can diagnose your broken garbage disposal and document whether it needs a repair, drain service, or replacement.