



You pull the ceiling fan chain, feel a loose snap, and end up holding a small beaded length in your hand. The fan stays still, or the light refuses to change, and the first instinct is often to order a replacement switch. That can solve the problem, but it can also send you after the wrong part.
A ceiling fan pull is only the visible part of a larger control system. The chain operates an internal switch, the switch selects an electrical path, and the motor or light responds. Diagnose that chain of events first, then decide whether you need a new chain, a switch, a capacitor repair, or professional electrical work.
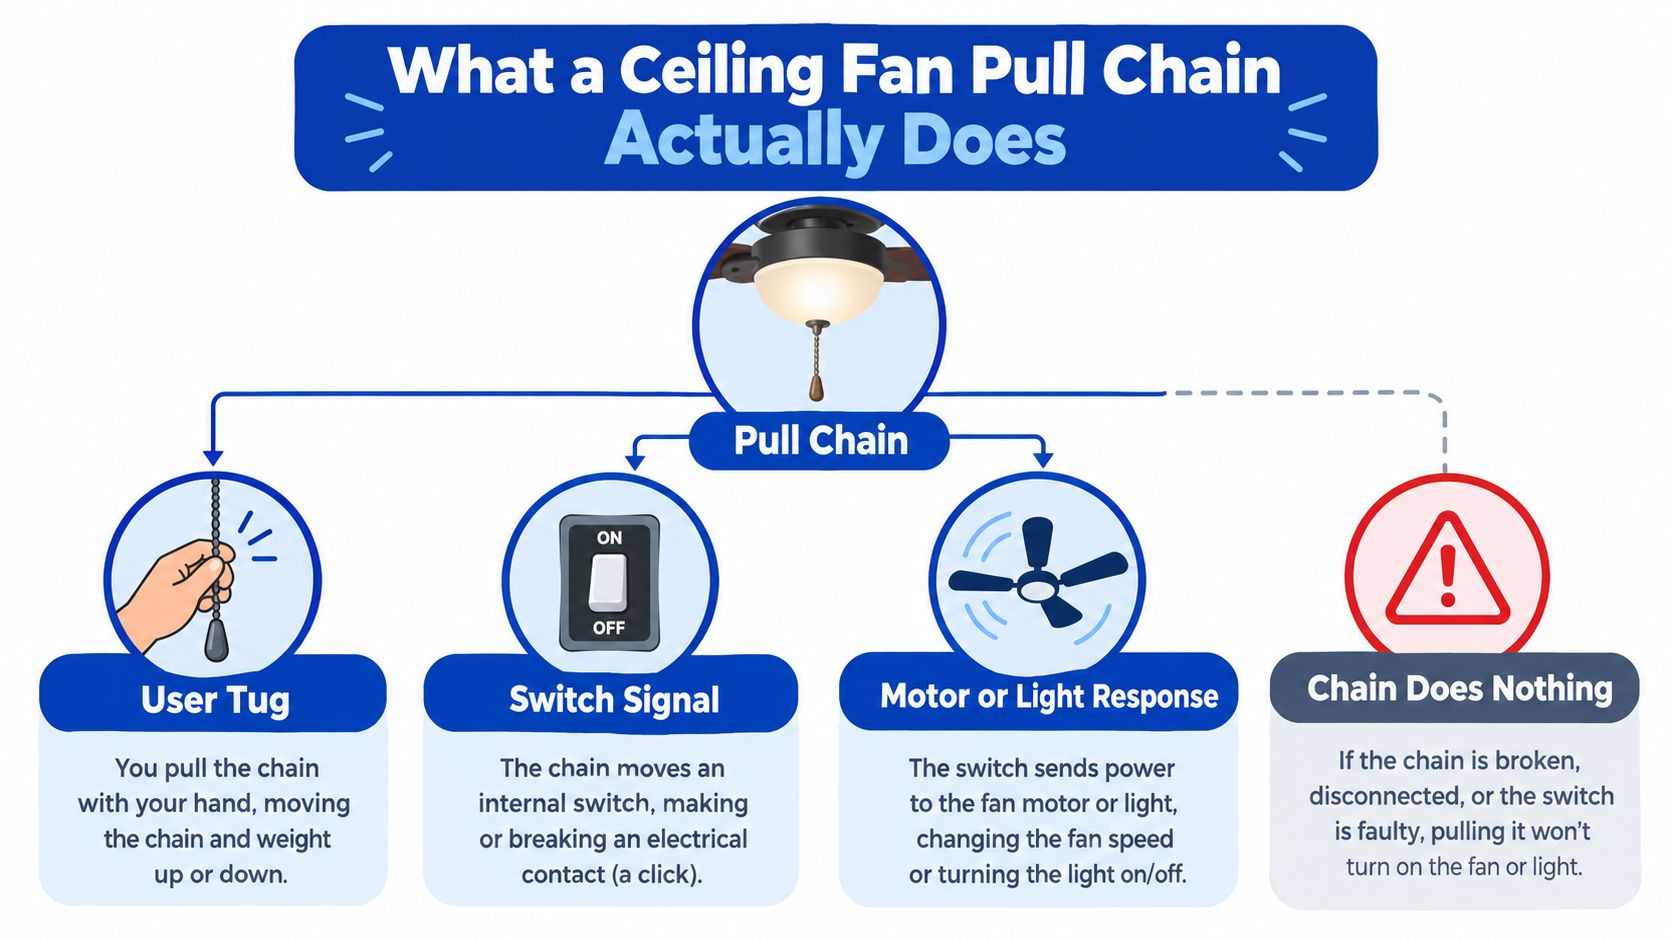
What a Ceiling Fan Pull Chain Actually Does
A pull chain isn't just a hanging ornament. When you tug it, the chain moves a small actuator connected to a rotary, multi-position switch inside the fan's switch housing. The switch changes which electrical contacts are connected, so the fan can turn on, change speed, or turn off. On a light kit, a separate chain usually operates a separate switch.
That simple movement has a useful history. The broader electric pull-switch mechanism reaches back to Harvey Hubbell's 1896 U.S. patent for a pull-operated incandescent-lamp socket, as documented in the history of pull switches. One pull changed the switch to one state, and the next pull returned it to the other. Ceiling fans later adopted the same direct approach because users could operate the fixture without adding wall wiring or installing a wall control.
Why many fans have two chains
By the late 1990s, many residential ceiling fans used a familiar two-chain layout. A 1998 U.S. patent describes one chain for the fan motor and another for an attached light kit, with the motor moving through a high, medium, low, and off sequence. The patent also describes the two chains as mounted in the switch housing, which is why the chains often hang close together beneath the fan.
That sequence causes a common misunderstanding. A fan may appear broken when its motor chain is set to off. A light may appear faulty when the homeowner is pulling the fan chain instead of the light chain. Identify the function of each chain before opening the housing or replacing anything.
The visible chain is only the starting point
A loose chain can mean the beaded chain detached from an otherwise usable switch. A broken pull stem can mean the internal switch needs replacement. A fan that runs at only one speed may point to the capacitor or motor circuit instead. These faults can feel similar from below, but they lead to different repairs.
Practical rule: Treat the chain as the user-facing actuator for an electrical switch. Don't assume that a damaged chain proves the switch itself has failed.
That distinction matters for safety, too. Once you open the switch housing, you may expose line-voltage conductors and motor-control components. The small part you can see from the floor may be harmless to replace, while the hidden switch and wiring deserve the same caution as other household electrical work.
How the Pull Chain Connects to the Switch and Motor
Inside a typical fan, the pull chain turns a rotary multi-position switch. The switch doesn't continuously throttle voltage like a simple volume knob. Instead, it routes line power through different motor-winding or capacitor combinations, creating distinct low, medium, and high operating points.
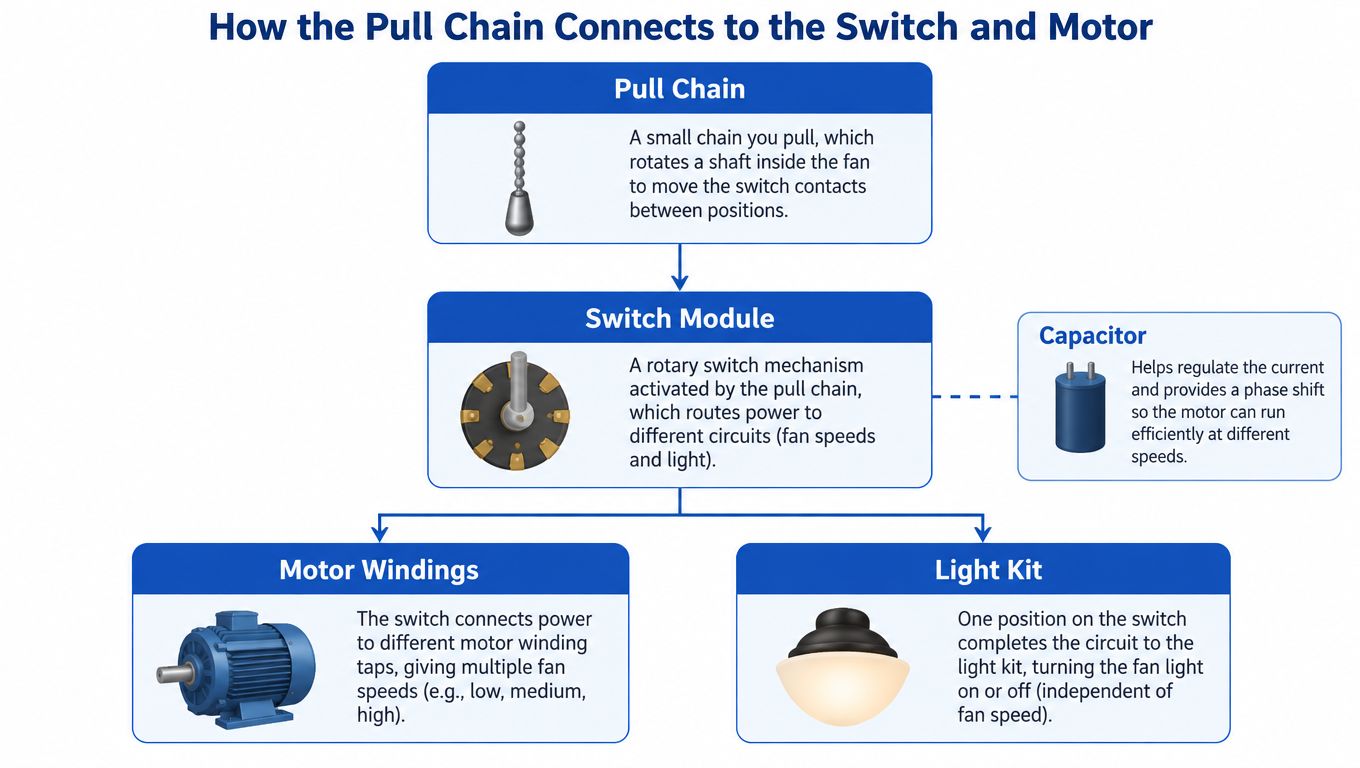
A common three-speed permanent-split-capacitor induction motor uses an auxiliary winding and a phase-shifting capacitor. The capacitor helps create starting torque and supports continued rotation. The fan-speed switch chooses among available electrical paths, while the motor windings and capacitor determine how the motor behaves on each setting.
What each pull changes
For a common three-speed arrangement, the chain may cycle through:
The exact order can vary by fan, so don't rely on the sequence above as a wiring diagram. It describes the operating logic, not a universal terminal map.
This is why a fan that runs only on high speed deserves careful diagnosis. A degraded or open speed capacitor can remove lower-speed behavior even when the chain still clicks normally. By contrast, a chain switch that produces no response in any position may have failed contacts, a broken lead, or no incoming power.
Separate the control faults from the motor faults
Listen and feel as you test. A clean click with no change may indicate a wiring, switch, capacitor, or motor problem. A chain that pulls without resistance may have detached from the switch. A rough, stiff, or inconsistent pull suggests mechanical wear inside the switch.
Don't buy a replacement just because the listing says “three-speed.” The new switch must match the original position sequence, terminal arrangement, and wire configuration. Manufacturers can use different terminal mappings for switches that appear similar.
The ceiling-fan speed-control explanation provides the underlying electrical distinction: the chain selects discrete paths, while the capacitor and motor windings influence the resulting speed. That mental model prevents a common mistake, replacing a switch when the actual fault lies in the capacitor or motor circuit.
Diagnosing What Is Actually Wrong
Start with the symptom, not the shopping list. Turn the wall control on only for observation, then use the chain gently to see whether the fan responds. Don't open the housing until you know which function has failed and you've prepared to de-energize the circuit correctly.
Four faults that look alike from the floor
A detached chain is usually the simplest possibility. If the chain came away in your hand but the switch stem remains visible and still clicks, the beaded chain or its connector may be the only failed part. You may be able to attach a new chain without replacing the switch.
A snapped internal stem is different. The chain may be missing, the stem may feel loose, or the switch may no longer provide its normal click. In that case, the switch body often needs replacement, even if the motor and light are otherwise healthy.
A failed three-speed switch can leave the fan completely unresponsive or stuck in one control state. A capacitor or motor fault can produce overlapping symptoms, especially when the fan runs only at high speed, hums, struggles to start, or fails to respond correctly despite a normal chain movement.
| Symptom | Most Likely Cause | DIY or Call a Pro |
|---|---|---|
| Chain detached, stem still clicks | Chain or connector failure | DIY only if no electrical parts must be exposed |
| Chain pulls loosely or stem is broken | Internal pull-switch damage | DIY for experienced homeowners, otherwise call a pro |
| No response in every chain position | Switch contacts, broken lead, or lost incoming power | Call a pro if testing or wiring is uncertain |
| Fan runs only at high speed | Speed capacitor or related motor circuit | Call a pro unless the exact component diagnosis is clear |
| Fan hums but doesn't start or spin normally | Capacitor, motor, or mechanical fault | Call a licensed electrician |
| Light works, fan doesn't, or fan works, light doesn't | Separate chain, switch, or circuit issue | Diagnose the affected control separately |
The wall switch isn't your safety test
A wall switch may not fully de-energize a ceiling fan. Some installations leave the fixture connected to a constant-hot supply even when the wall control is off. Before touching conductors, turn off the correct branch-circuit breaker and verify the absence of voltage with a properly rated tester.
Stop immediately if you find brittle insulation, scorch marks, melted plastic, a burning smell, unexplained wiring, a loose mounting box, or a circuit that trips. Those conditions move the job beyond a simple chain repair.
Choosing the Right Replacement Pull Chain or Switch
Once the symptoms point to a switch, match the original part carefully. The opening in the fan housing tells you about mechanical fit, but it doesn't tell you whether the terminals and electrical sequence are correct.
Build a match before you buy
Use the old switch, its label, and a clear wiring photograph as your reference. Check:
A representative two-circuit fan switch is rated 6 A at 125 VAC and 3 A at 250 VAC, with UL and CSA listing, according to this fan-switch product specification. Another four-wire fan switch uses the same ratings. These figures are benchmarks for the listed products, not permission to install an unverified substitute.
Avoid controls that aren't made for motors
A ceiling fan motor is an inductive load. The wrong switch can cause contact arcing, overheating, audible hum, or early failure. Don't use a light-only switch, an ordinary wall dimmer, or a generic control just because it fits the housing hole.
Look for a product listing that identifies the intended fan application and provides appropriate voltage and amperage ratings. UL or CSA listing adds useful evidence that the component was evaluated for its stated use. If the listing doesn't show terminal mapping or the wiring doesn't resemble the original part, pause before ordering.
For an older or unusual fan, the safest purchase may be a manufacturer-specific replacement. If you can't identify the original switch, or the fan combines motor and light controls in an unfamiliar assembly, an electrician can identify the part while inspecting the rest of the fixture.
Safe Replacement and Installation Steps
A chain replacement can be simple, but an internal switch replacement is electrical work. Use a stable ladder, keep the fixture supported, and don't work alone if you need to hold a light kit or housing overhead.
Start with the circuit, not the chain
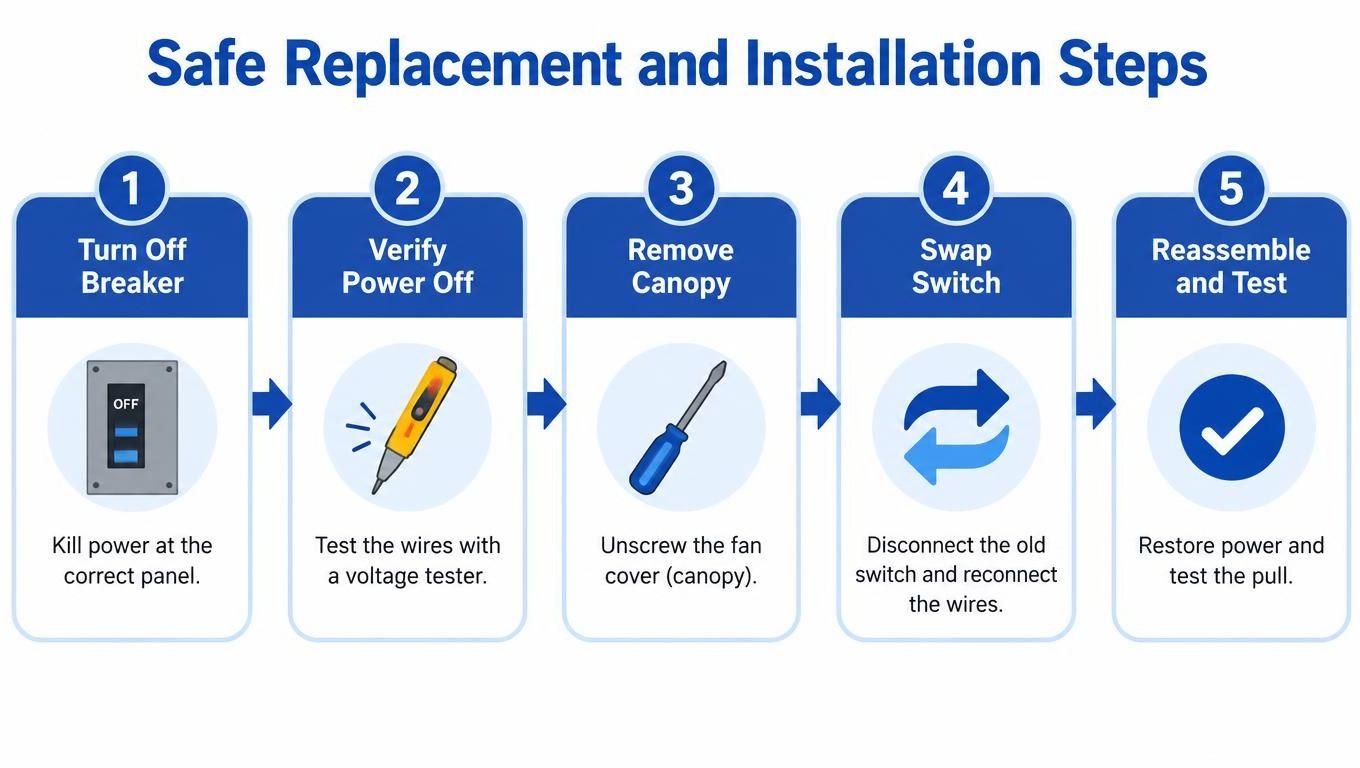
If the chain only detached and the switch stem still works, you may not need to open the electrical housing. A compatible beaded chain and repair connector can restore the pull. Make the first pulls straight down and gently. Sideways force stresses the connector and stem.
For a visual demonstration of the general repair process, this ceiling fan pull-switch repair video can help you recognize the parts before you begin. It doesn't replace the instructions for your specific fan or switch.
Test without guessing
Restore power only after the housing is secure. Test the light separately, then cycle the fan through each available setting, checking for a clean click and a corresponding change in operation. Stop if the breaker trips, the fan hums, the switch becomes hot, you smell burning, or the chain doesn't behave normally.
If you need to remove a fan housing near structural framing, first identify how the fixture is supported. A related guide on how far apart ceiling joists are may help you understand the surrounding ceiling layout, but it isn't a substitute for confirming that the electrical box is rated and securely mounted for a fan.
Call a licensed electrician when you can't verify the circuit is dead, can't identify the switch terminals, find damaged wiring, or suspect a capacitor, motor, or mounting problem. A small repair isn't worth a shock, fire risk, or falling fixture.
Repair, Retrofit, or Replace the Whole Fan
A broken pull chain doesn't automatically justify a new fan. It also doesn't mean a chain repair is always the best long-term choice. Choose among repair, control retrofit, and fixture replacement by considering the fan's condition, who needs to operate it, and how the room is used.
Repair the existing pull
Repair makes sense when the fan runs smoothly, the housing and wiring look sound, and the chain or switch is the only problem. It preserves the existing fixture and avoids changing a mounting arrangement that already works. For a reachable fan in a room where direct control is convenient, the simplest compatible switch is often the most sensible answer.
A pull-chain fan can also remain an efficient cooling tool. Ceiling fans typically draw about 30 to 100 watts, while air-conditioning loads are commonly associated with roughly 500 to 5,000 watts, as summarized in the provided fan-control research. Those ranges are broad, so actual use depends on the equipment and operating conditions, but they illustrate why repairing a usable fan can preserve a lower-energy way to improve comfort.
Retrofit for access and control
A pull chain may be hard to reach for wheelchair users, older adults, children, or anyone dealing with a high ceiling. A properly rated wall control, compatible fan controller, remote receiver, or smart control can put operation within easier reach. The control still has to match the motor type, light kit, wiring, and load. A standard light dimmer remains unsuitable for a fan motor.
The same research reports 2024 testing of electronic speed management with projected savings of up to 30%, so electronic control may deserve consideration when accessibility and operating efficiency matter. Treat that figure as a study finding and projection, not a guarantee for every household or fan.
For broader electrical planning, the Growth 4 Trades electrical guide offers useful context on the kind of work electricians handle and the questions homeowners should ask before hiring. If you need help evaluating credentials and fit, use this guide on how to choose a contractor.
Replace when the fixture is the problem
Replacement becomes more reasonable when the fan has several issues at once, such as a failing motor, unsafe mounting, damaged wiring, severe wobble, or a light kit that no longer suits the room. A new fixture also lets you choose a control system designed into the fan rather than adapting an incompatible one.
Don't choose based on the pull chain alone. A sound old fan may need only a switch, while a damaged fan may continue creating problems after a new chain is installed.
Key Takeaways and Quick Decision Aid
Start with diagnosis. A detached chain may need only a new beaded pull, while a broken stem points to the internal switch. A fan that runs only at high speed can involve the capacitor, and humming or non-starting behavior can involve the motor circuit.
Use the breaker and a properly rated tester before opening the housing. Match the replacement switch to the original position sequence, terminals, wiring, voltage, and motor-load rating, rather than buying the first part labeled three-speed.
Quick answers
Can I replace a chain without opening the housing?Yes, if the chain detached and the switch stem still clicks and changes the function. Use a compatible chain and connector, and pull straight down gently.
Does a broken chain mean the whole switch is bad?No. The chain or connector may have failed while the switch remains usable. A loose stem, missing click, or no response after a correct chain repair points more strongly toward switch damage.
When should a handyman call an electrician?Stop when you can't verify the power is off, wiring is damaged or unfamiliar, the breaker trips, the fan hums, or the fault may involve the capacitor, motor, mounting box, or line-voltage connections.
If the diagnosis is uncertain, don't guess with replacement parts. Have the fixture inspected before you turn a small ceiling fan pull problem into a larger electrical repair.
HomeProBadge helps homeowners find identity- and background-verified home service professionals with licensing, insurance, verified reviews, and proof of past work. Visit HomeProBadge to find a qualified electrician when a ceiling fan pull repair reaches the point where safe diagnosis matters more than another parts order.