



The popular advice is simple: use replacement windows in an existing home and new-construction windows in a new home. That rule is convenient, but it can lead homeowners toward the wrong installation. The more important question is whether the existing frame, sill, flashing, and surrounding wall can still manage water and air safely.
A replacement insert may preserve siding, trim, and interior finishes, but it also relies on the assembly that remains behind it. A full-frame installation causes more disruption, yet it exposes the rough opening where hidden rot, failed flashing, poor insulation, and damaged sheathing can be corrected. The key difference between replacement windows and new construction is therefore less about the glass and more about where the installer stops removing the old assembly.
| Factor | Replacement insert | New-construction or full-frame installation |
|---|---|---|
| Installation boundary | Fits inside the existing frame | Extends to the rough opening |
| Exterior work | Usually preserves siding and trim | May require siding or exterior trim removal |
| Wall inspection | Limited to exposed existing conditions | Allows inspection of framing, sheathing, flashing, and insulation |
| Typical project fit | Sound existing frame and modest upgrade | New walls, additions, major renovation, or damaged openings |
| Main risk | Concealing defects in the retained assembly | More labor, finish repair, and permit coordination |
| Energy result | Depends heavily on the retained frame and perimeter sealing | Depends on the complete rebuilt opening and installation quality |
The Hidden Risks of a Simple Window Swap
Replacement windows are often presented as the safer, cheaper answer for an older house. They're less disruptive, and that can be valuable. But a quick installation becomes a liability when the contractor treats the existing frame as sound without inspecting it.
An insert replacement removes the old sash and places a new unit inside the original frame. That approach can leave rotten wood, failed perimeter flashing, staining, and air leaks concealed behind the new product. The homeowner sees a clean interior finish, while water may still be entering through the sill or jamb and moving into the wall.
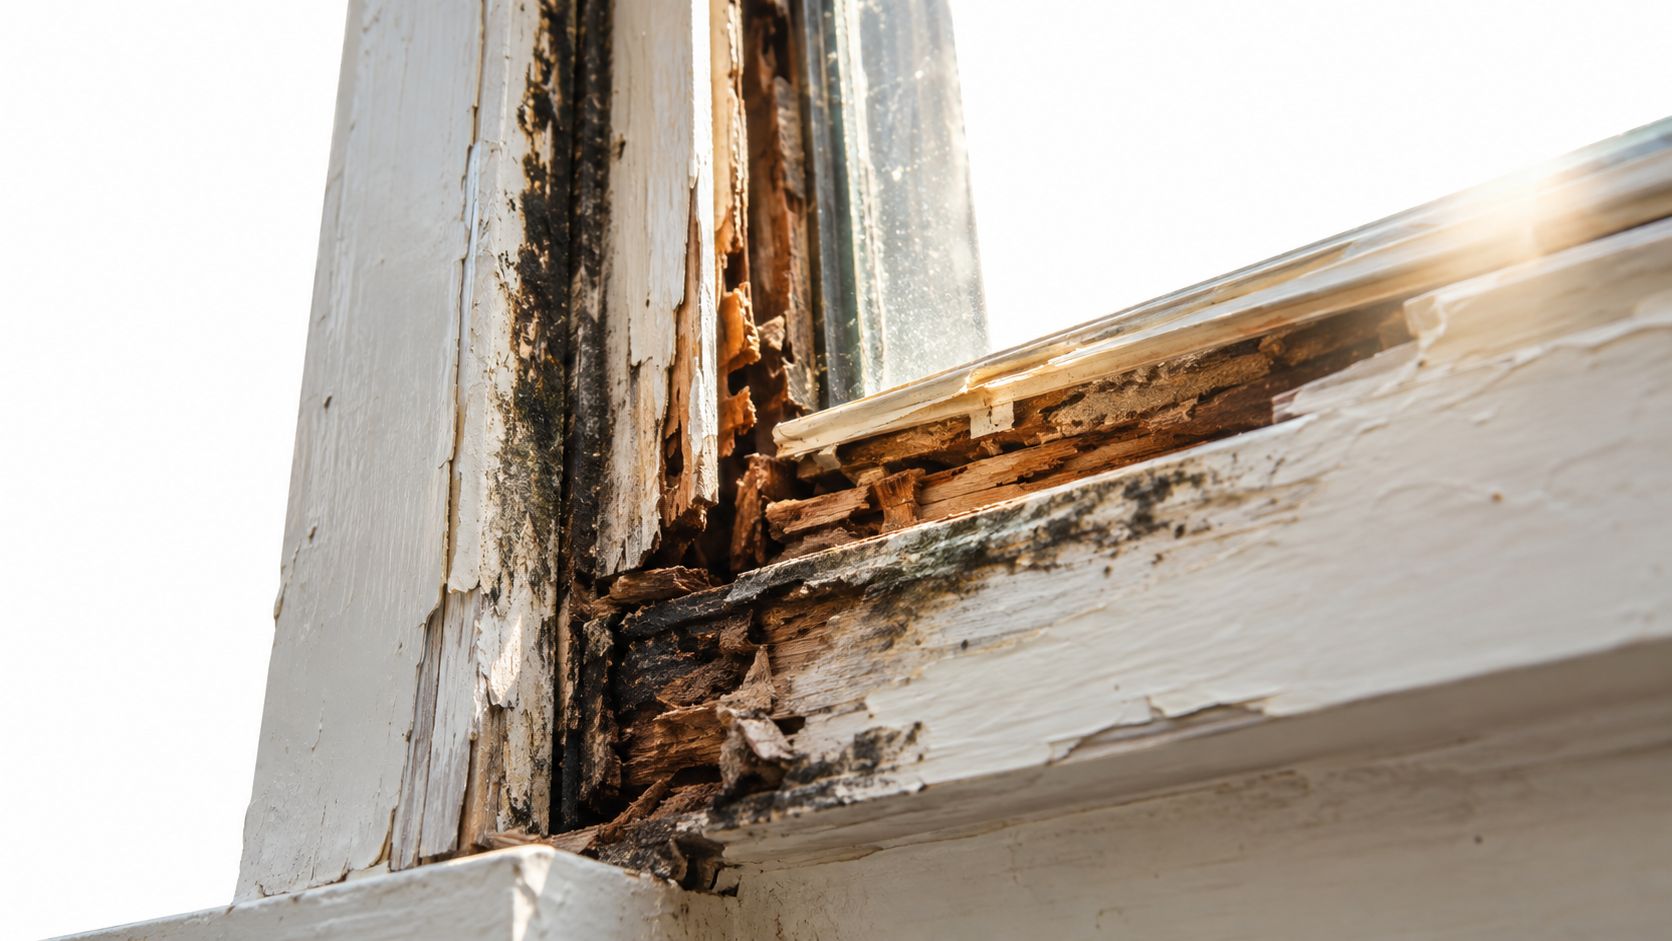
The frame is part of the window system
A frame isn't just a support around the glass. It connects the window to the wall's drainage plane, air barrier, insulation, and interior finish. If those connections have failed, installing a better sash inside the opening won't rebuild them.
Look for:
Building Science Corporation's guidance emphasizes that proper flashing, shimming, blocking, and membrane laps still matter even when a window has a nailing flange. A flange helps connect the unit to the wall, but it doesn't make a damaged opening watertight by itself.
Practical rule: If the old sill can't drain or the jambs are soft, don't let a low-disruption installation dictate the project. Expose the opening first.
Permit obligations can also change the scope. Before work begins, check local requirements using this home improvement permits guide, particularly if the opening, header, exterior protection, or bedroom egress may change.
Installation Boundaries and Framing Requirements
The cleanest way to understand these products is to ignore the labels for a moment and follow the installation boundary. A replacement insert is normally installed inside the retained frame. A new-construction window is typically installed after the old assembly is removed to the rough opening, where its nailing fin attaches to exposed wall framing.
That distinction controls the sequencing. With an insert, the installer measures the existing frame, removes the operable sash and related components, prepares the pocket, sets the replacement unit, and seals its perimeter. The siding, exterior trim, and much of the interior casing can remain in place.
With a full-frame installation, the crew removes the old window and frame, and may remove or cut back siding, exterior trim, drywall, or interior casing. The installer can then inspect the rough opening, correct framing, replace damaged sheathing, install a sill pan, renew insulation, and connect flashing to the weather-resistive barrier.
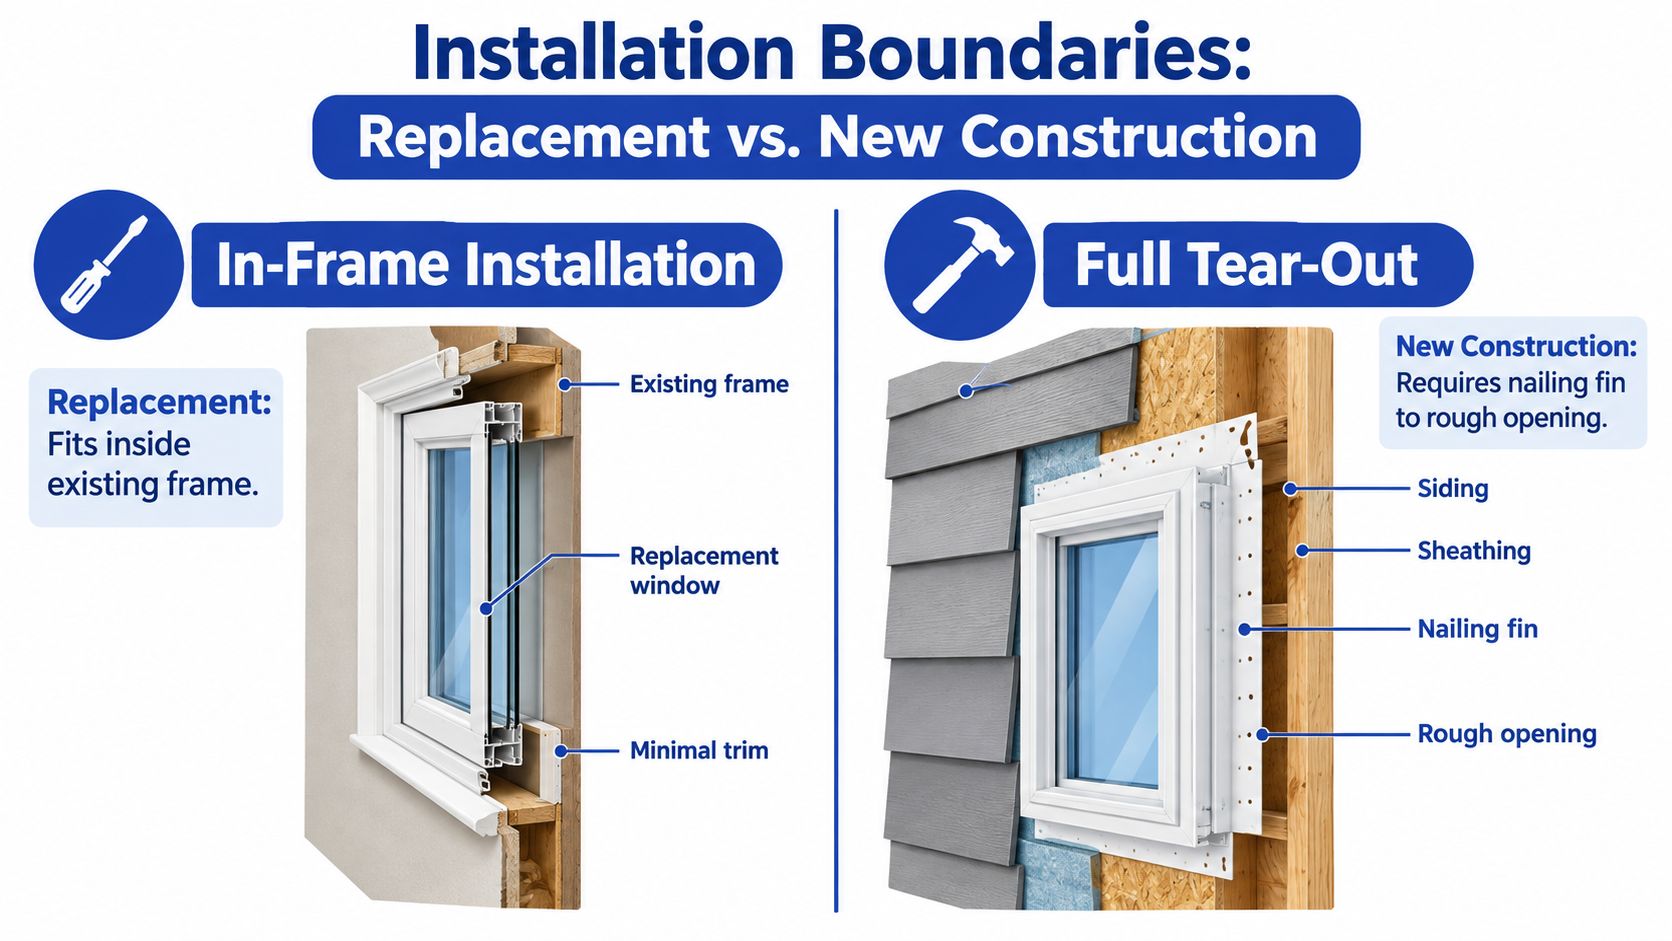
What the nailing fin actually does
The nailing fin, also called a flange, projects from the perimeter of a flanged full-frame unit. It gives the installer a defined attachment and flashing surface at the rough opening. The fin isn't a substitute for structural shims, blocking, or a continuous drainage strategy, but it makes those layers easier to coordinate when the wall is open.
The sequence generally looks like this:
The two methods can use similarly rated glass, frames, and coatings. Their practical performance differs because the wall connection differs. A full-frame installation offers access to more of the assembly, while an insert preserves more of the old one.
Watch the installation sequence in this visual walkthrough, then ask the contractor to identify which layers will be exposed and rebuilt on your home.
Energy Performance and Air Leakage Realities
A new-construction window does not automatically outperform a replacement window. Window type describes the installation method, not the thermal result. Performance depends on the product's ratings and on how well the installed perimeter controls heat flow, air movement, and water.
ENERGY STAR defines U-factor as heat transfer through the window. Lower values indicate better insulation. It also defines air leakage as airflow through window joints, measured in cubic feet per minute per square foot. Lower values are preferred, and its qualification criteria set a maximum air-leakage rating of 0.3 cfm/ft² (ENERGY STAR residential window specification).
Read the complete NFRC label
Do not compare U-factor alone. Ask for the complete NFRC-certified label and review:
The right combination depends on climate, orientation, shading, and the building's heating and cooling needs. Installation still determines whether the product can deliver those ratings. The perimeter must be sealed correctly, the drainage path must remain open, and gaps around shims or fasteners must be avoided.
Windows can account for about 10% of building energy use, while they affect heating and cooling uses representing roughly 40% of building energy use, according to ENERGY STAR's window and door partner resource guide. Those figures show why the installation boundary matters, but they do not predict savings for a particular home.
ENERGY STAR states that qualified replacement windows can reduce household energy bills by approximately 7% to 15%, with national examples estimating annual savings of about $71 to $501, depending on location, per the same ENERGY STAR partner resource guide cited above. The same analysis estimates that qualified windows replacing single-pane units can save roughly $125 to $340 per year, while savings over clear double-pane windows are smaller.
For a practical overview of upgrading to energy-efficient glazing, evaluate the complete assembly, including the retained frame, perimeter seal, drainage path, and glass package. A highly rated window cannot compensate for concealed rot or failed flashing left behind an insert.
Field Inspection Checklist for Existing Frames
An insert is appropriate only when the retained frame can still support the new window and manage water. A contractor who measures the opening without inspecting the sill and jambs is measuring a product location, not evaluating the building envelope.
Start inside, then work outward. Use a flashlight, an awl, a straightedge, and a level. Photograph every condition before trim or sash removal so the proposal reflects what the crew found.
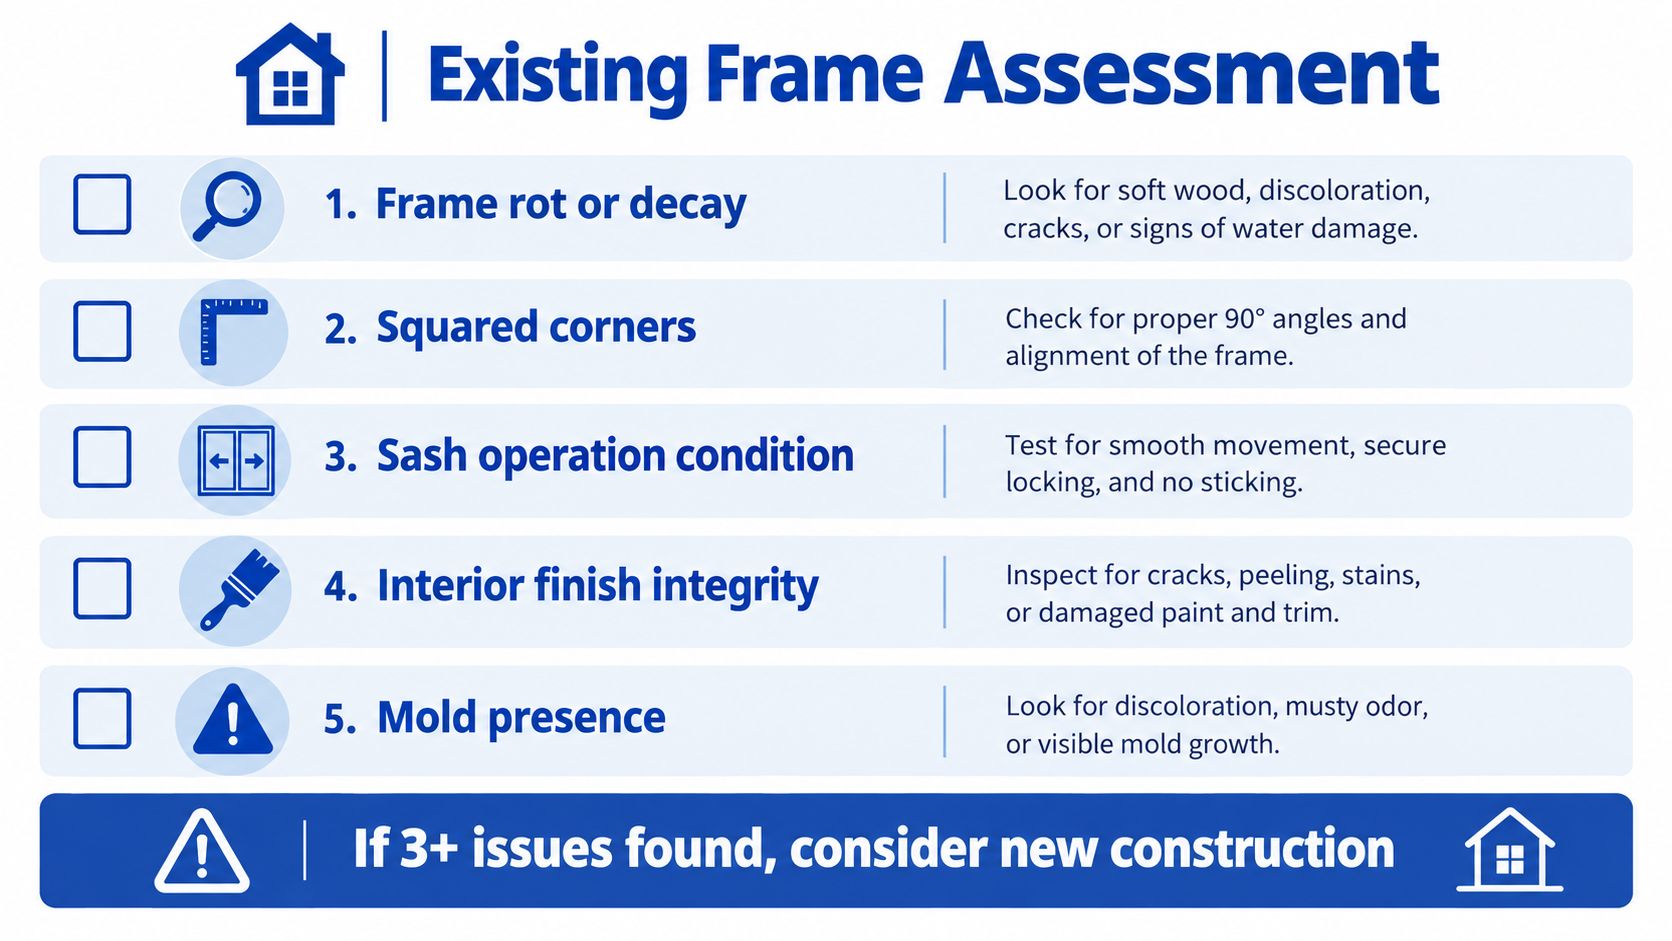
Inspect the retained assembly
If the inspection finds moisture damage, don't treat the insert as a way to make the evidence disappear. A full-frame approach may be necessary to remove damaged material and rebuild the water-management layers.
For significant framing movement or suspected structural damage, involve a qualified professional and review this guidance on finding a licensed structural engineer. The window installer can identify installation conditions, but a structural question requires the right scope of expertise.
Project Timelines and Hidden Structural Costs
The insert usually has the smaller construction footprint. It can preserve siding, exterior trim, interior casing, and nearby finishes, which reduces the number of trades involved. That doesn't make it universally cheaper, because repair work can still emerge once the old sash and stops are removed, but the planned scope is generally narrower.
A full-frame installation has a broader chain of work. The crew may remove siding or trim, expose the sheathing, repair framing, install flashing and a sill pan, insulate the perimeter, and restore interior and exterior finishes. If rot extends beyond the opening, the window becomes one part of a wall repair rather than a standalone replacement.
Costs that appear after demolition
A trustworthy proposal separates the window unit from the work required to install it. Ask whether the price includes:
Homeowners planning around other trades can use this resource on the timeline for ordering replacement windows. Ordering is only one part of the schedule. The crew also needs time for inspection, repairs, weather exposure, inspections, and finish work.
Permit and compliance questions
A window job may involve more than swapping one product for another. Full-frame work, enlarged openings, header changes, structural modifications, and bedroom egress changes commonly require local permits or inspections. Municipal rules vary, so the contractor should identify the permit category before ordering the unit.
“Same size” doesn't guarantee the same compliance. A replacement frame can reduce the clear opening, alter sill height, or change the emergency escape path. Those changes matter in bedrooms and in older homes where insurance records, historic appearance, or prior alterations may be relevant.
The construction sequence should therefore be priced and documented as a wall-opening project when the evidence calls for it. Saving finish work on paper isn't a saving if the crew later discovers damage that the original scope never addressed.
When to Choose Each Window Installation Method
The right choice follows the condition of the opening and the scope of the renovation. A homeowner who wants minimal disruption should still choose full-frame work if the retained assembly can't be trusted. Conversely, tearing out a sound frame only because a flanged unit sounds more sturdy can create unnecessary finish damage.
| Existing condition or project | More suitable approach | Reason |
|---|---|---|
| Sound, square frame with no moisture evidence | Replacement insert | Preserves surrounding finishes and limits disruption |
| Rot, staining, failed flashing, or damaged sheathing | Full-frame installation | Exposes the layers that need repair |
| New home or open wall framing | New-construction unit | The rough opening is accessible before cladding |
| Addition or major remodel | New-construction or full-frame unit | Wall sequencing supports flange and flashing integration |
| Bedroom opening with uncertain clear dimensions | Detailed assessment before selection | Product size can affect egress |
| Historic opening requiring correction | Full-frame evaluation | Allows correction of rough-opening and frame conditions |

Situations that favor an insert
Choose an insert when the existing frame is structurally sound, square, dry, and properly drained, and when the objective is to renew glazing or operation without disturbing finishes. This approach is particularly sensible when matching existing trim matters or when only selected openings are being upgraded.
Don't choose it merely because the salesperson calls it a replacement. Ask what happens if the sill is soft after removal, how perimeter air sealing will be handled, and whether the warranty excludes pre-existing wall damage.
Situations that favor full-frame work
Use full-frame installation when the wall is already open, when the project changes the opening, or when inspection reveals water damage. It also fits additions, major renovations, and restorations where the rough opening needs correction rather than concealment.
Product terminology varies, so compare the actual installation detail. A contractor experienced with SuperiorPRO window installations can still need to choose between an insert, a flangeless full-frame unit, and a flanged full-frame unit based on the opening's condition.
The decision isn't “old house equals replacement” or “better window equals new construction.” It's sound retained assembly versus rebuilt opening.
Contract Requirements and Verification Steps
The contract should identify the installation boundary in plain language. “Replace windows” isn't enough. State whether the crew will remove only the sash, remove the existing frame, or expose the rough opening and exterior control layers.
Require these items before signing:
Verify the work before it disappears
Take dated photos before removal, during the exposed-opening stage, and after flashing and sealing are complete. The most useful image is not the finished trim. It's the open sill, the membrane laps, the shims, the fasteners, and the repaired substrate before those details are covered.
Ask the installer to provide the product label, permit records, inspection sign-offs, and a signed completion record. If the crew discovers damage, the condition report should show what was found, what was replaced, and how the repair connects to the existing wall system.
Verify the contractor's identity, licensing, and insurance before work starts, using this resource on contractor license and insurance. For this type of project, proof matters because the most consequential work often happens before the new window is visible.
HomeProBadge lets homeowners review verified professionals, project photos, documented credentials, and proof-of-work records, while contractors can attach condition reports and completion evidence to their profiles. Visit HomeProBadge to compare verified pros before you approve a window installation that will seal the wall for years.